Category: Projects

August 20, 2025 – Introducing My Mistress

I know, I just kind of dropped off of the face of the earth. Most outages are planned and I try to make some kind of announcement. But, I just got overwhelmed and hyper-focused with what I had to do. My wife has set my deadline at August 31 which I should comfortably make. But, you would be surprised at how many steps go into this seemingly simple process.

I should also mention that in the middle of last weekend, I also had to redo the front brakes of my Lincoln Navigator. I needed the Navigator to go get sheetrock so that I could continue making progress on this project. I was forbidden to drive it unless I fixed the brakes. Add that to the list of reasons why I was not able to write.

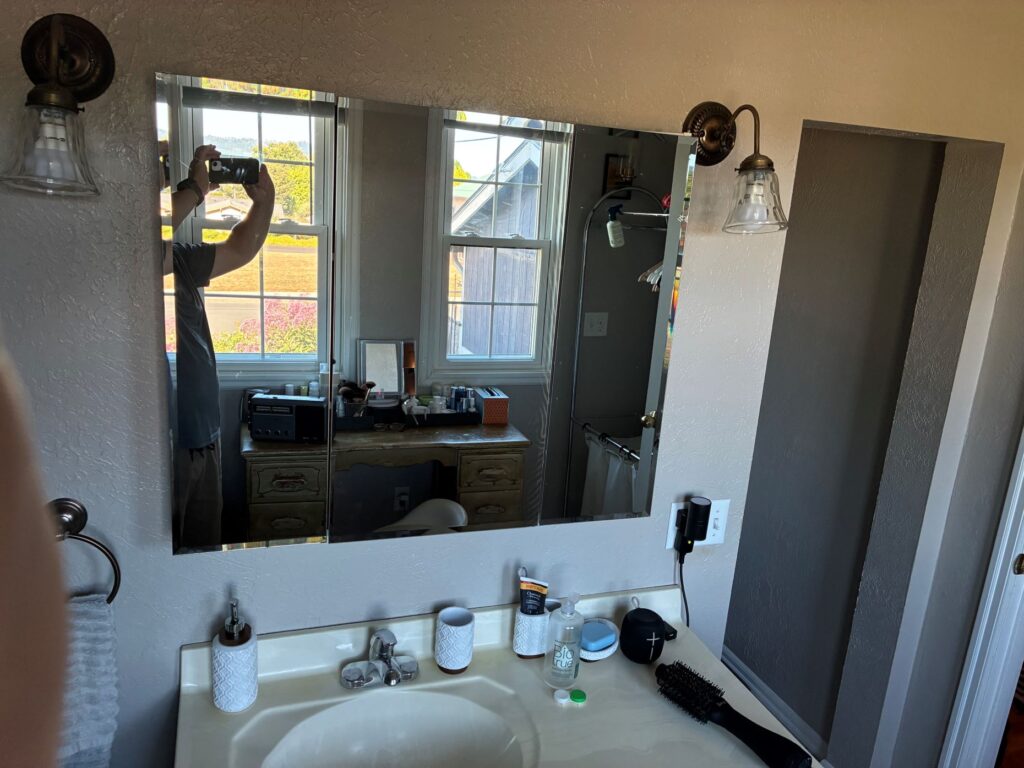
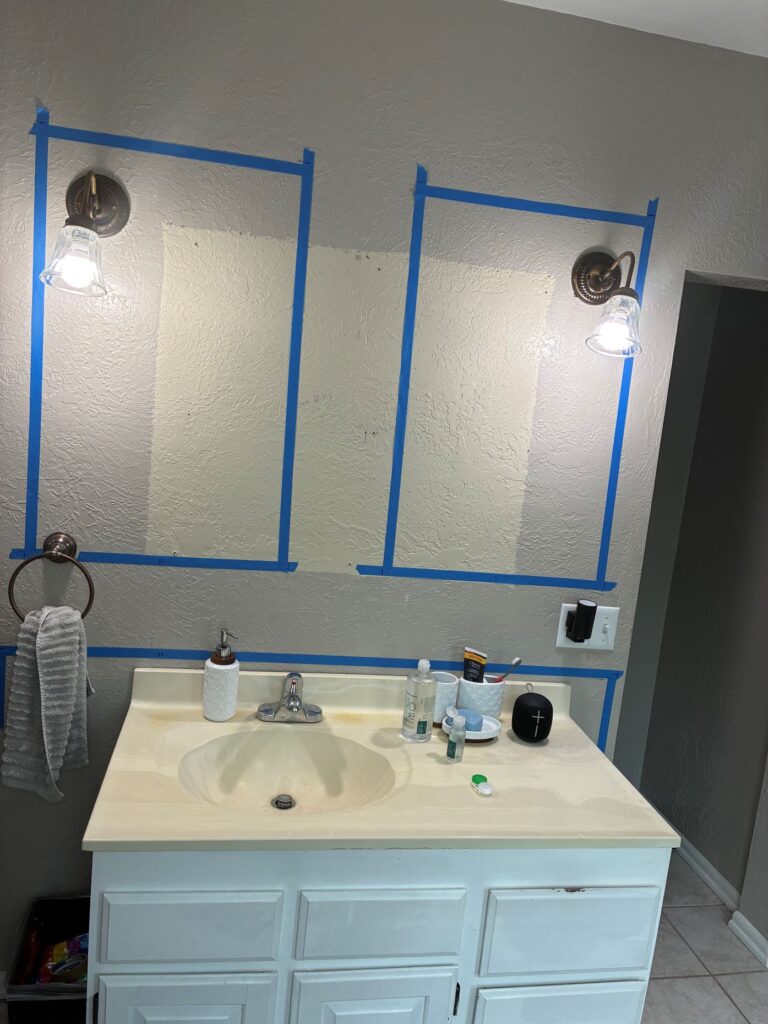
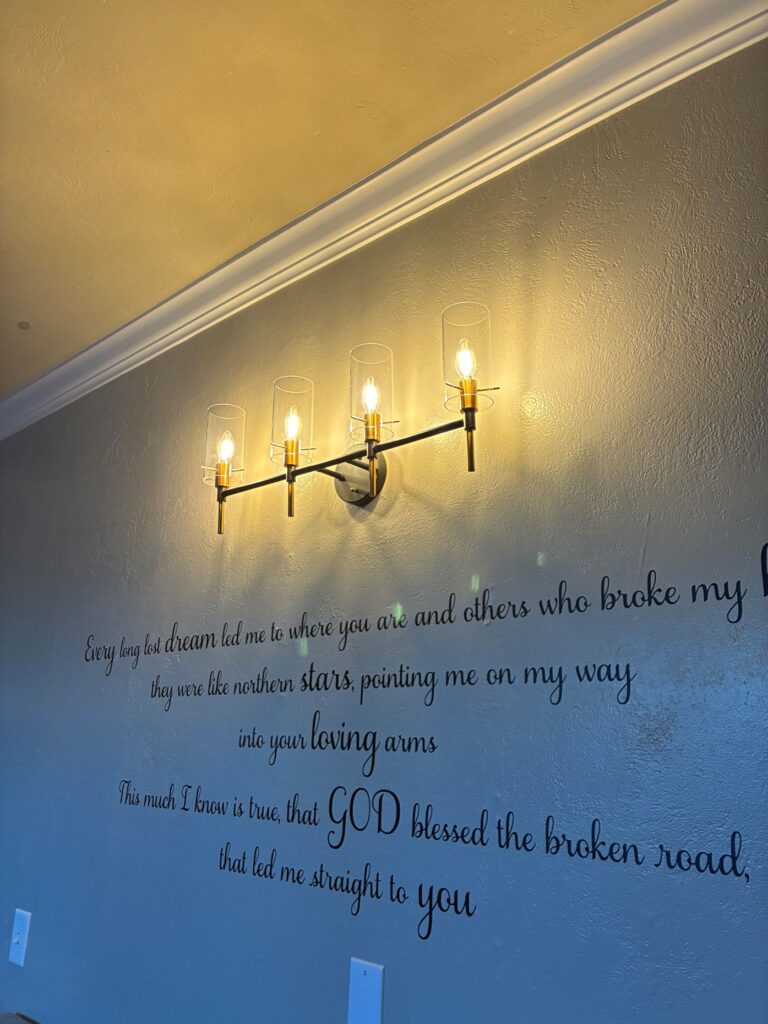
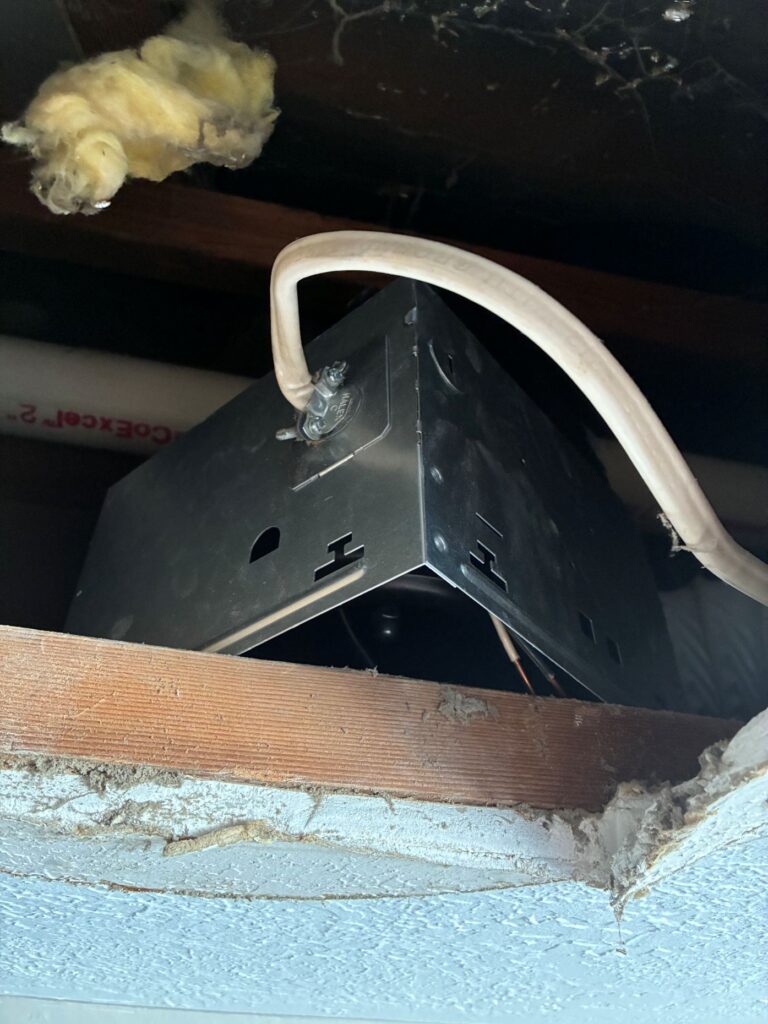
I know that I have already written about this once and will possibly show the finished product in a week or so. When I casually said, I can do that, I had no idea what that really meant. It has also been really helpful that the finished vanity is right behind me so I can take measurements. For instance, because I did a mock-up, I realized that the backsplash was going to hit the switch plate cover. Rather than trying to modify the cover, I decided to move the electrical box up so that it would clear the backsplash.

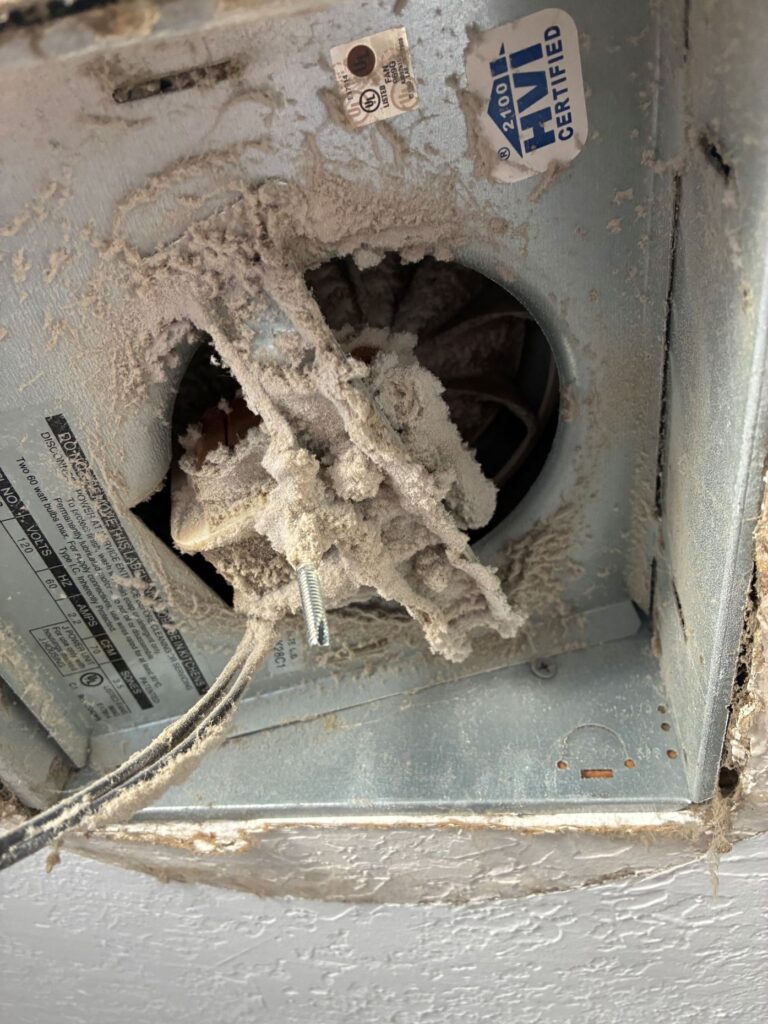
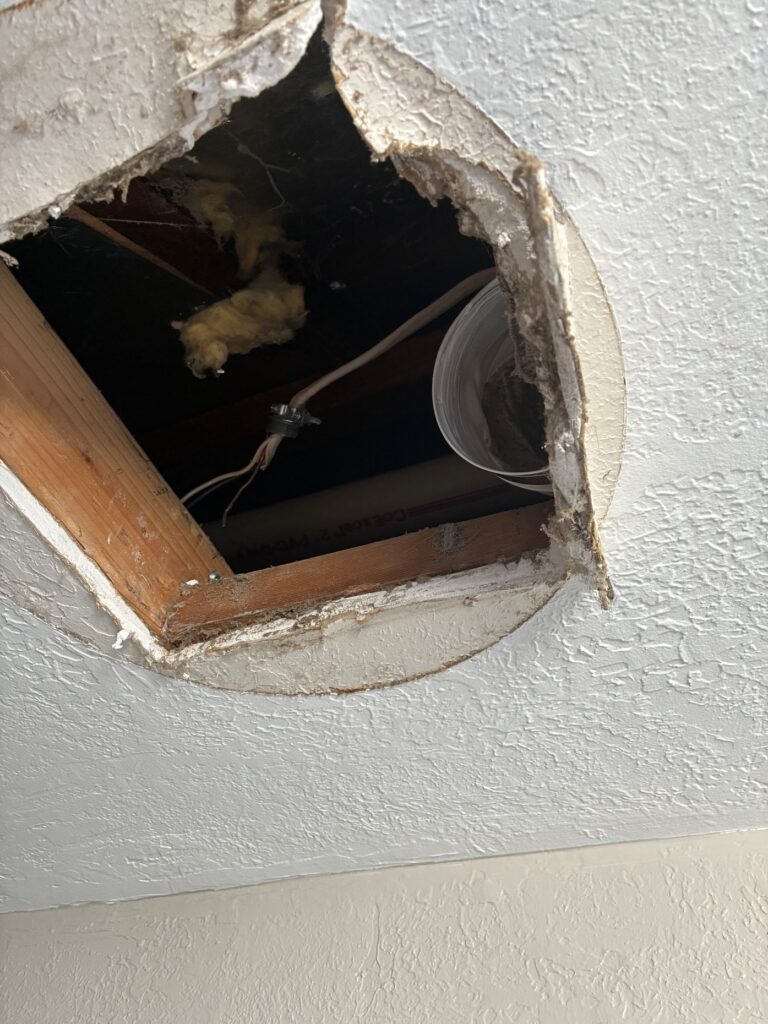
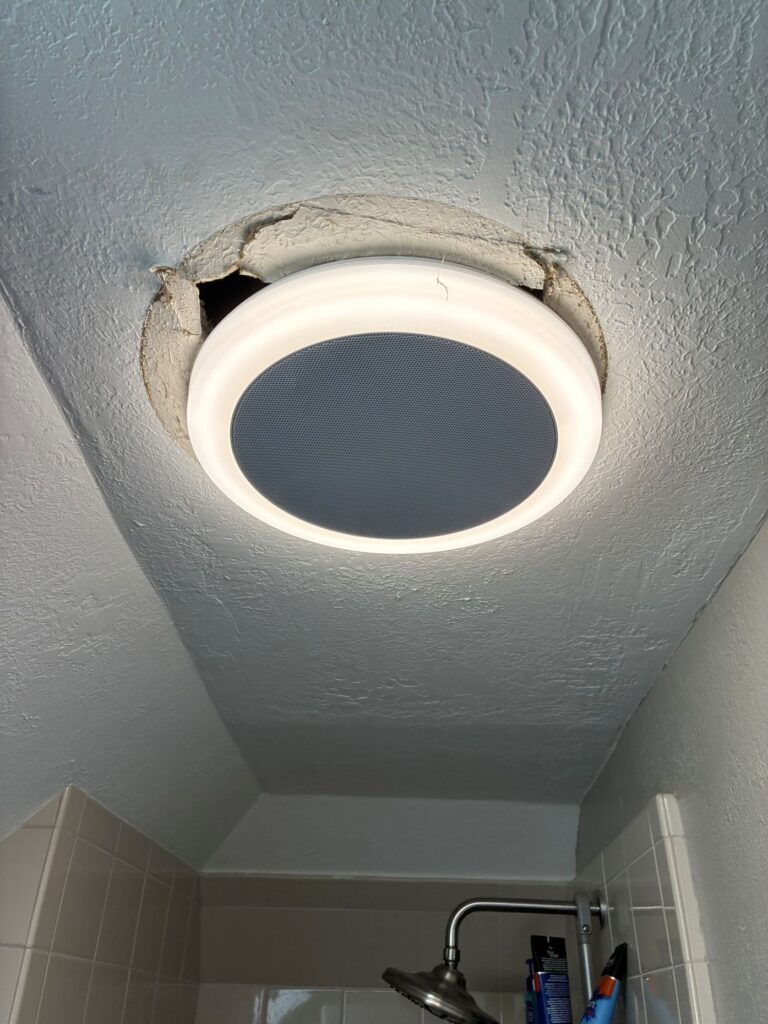
I was already doing electrical work to add the new light fixture. While I would have preferred to eliminate the round junction boxes for the old lights, the wiring was just too complicated to fix without ripping out the ceiling and re-wiring the bathroom fan as well.

Speaking of old electrical work, those junction boxes turned out to be antiquated. They are 3 1/2″ round which is a size that is not made anymore, at least I didn’t run across it. By proxy, I was not able to find paintable covers, except for one. I tried all of the local hardware stores and both box stores. Ordering was the only way to get something that would work.

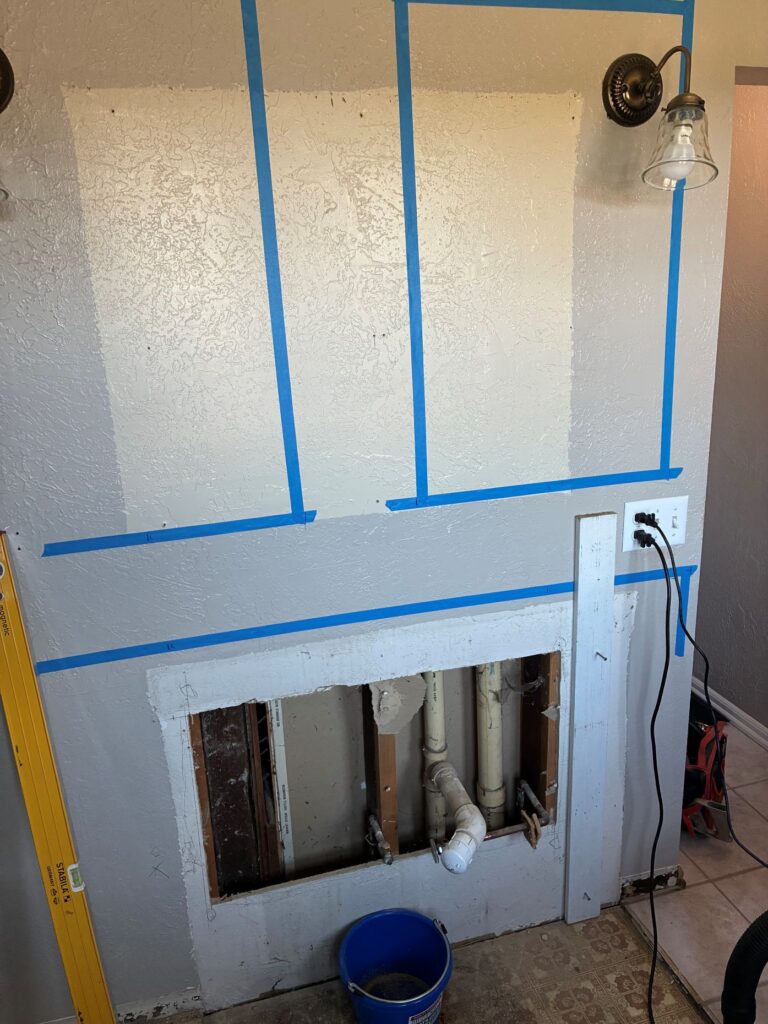
I had a dream of insetting the medicine cabinets into the wall. That is just a better look to me, but it meant that I needed to take a critical look at the framing given that was a structural wall. I took a good chunk of drywall out to do the wiring and see what I could see with the framing. No dice there, the vent stack ran right where I wanted to inset the medicine cabinet and I was not about to re-plumb all of the drain pipes to make it work. I would have been possible but not without a lot more time, money and effort.

When I committed to the project, I didn’t give any thought to the plumbing. Well, only a little. I figured plumbing was there so it should work. I thought that I would tee off of the existing shut-off valves to each fixture. That was before I learned that each fixture should have a shut-off. Since I had to modify the rough plumbing, I might as well make it so that I had to modify the cabinet as little as possible.

I also learned the copper flux can go bad. After hours wondering why I couldn’t get the solder to work, I finally decided to change the only variable that I hadn’t changed which was the flux. Pretty soon I had one joint completed in five minutes instead of 15 minutes on the torch and $20 of solder on the bench top. That stuff has gotten crazy expensive at $41 for a half pound roll.

All that was child’s play when it came up against the drain plumbing. I thought that I was going to add a p-trap to each sink and then out the drain until I was wondering if the pipes needed some pitch. It turns out that I needed a whole new setup. I was scratching my head with a whole bucket full of pieces wondering if I got the right stuff. I am still not sure until I get to the point of doing the work.

I haven’t done a serious project like this since I remodeled the little house in 2020. I was telling my wife, image if someone didn’t know what they were doing and had to call a plumber, electrician, drywaller and painter. This would would be a serious financial investment. The vanity wasn’t cheap to begin with but I wouldn’t be surprised if it was $20,000 job.

End Your Programming Routine: On the surface, it seems simple, replace one vanity with another. But, boy oh boy going from one sink to two is an exponential dynamic. It’s good though, it flexes some muscles that have atrophied. I know that it is going to be something that I can be proud of because I was careful and did everything right.

August 12, 2025 – I Must Be Crazy…

Well not really, it was kind of a deal with the devil so to speak. I had it all planned out, I was going to buy my wife a really nice gift for her 50th but then she asked me if we could redo the bathroom. This isn’t a surprise, she also asked for it for Christmas. I of course said yes because that is what she wanted.

I call is a deal with the devil because this is supposed to be when my summer started. I was supposed to be enjoying the last days by hiking and planting and all the other stuff. Now, I have this large project that I am embroiled in. The truth is that I am being a little over dramatic. I haven’t done a significant project in quite a while and I don’t think it will take too long.

Here is the plan. I am going to change two light fixtures. The vanity is getting changed from 36 inches to 60 inches and from a single sink to a double sink. The medicine cabinet is getting switched from a single unit to two units. Because of that, I have to reroute the electrical to a new electrical box in the center of the everything.

You can see the mock-up from the picture. The tape represents the two mirrors and the vanity footprint. I already have it in my head that I am going to have to tear into the wall, but the trick with the mirrors is that they need to be centered on the sink location. That needs to fit into the existing space appropriately.

I would dearly like to put the medicine cabinet into the wall cavity, but that wall is a structural wall. It is one side of the house as the bathroom is a shed addition as well as holding up the stair case. I don’t really know how much chaos that would cause to do until I open the wall. That will be a to be determined.

Just like pulling a sweater thread, I cannot cut into the wall until I remove the existing vanity. The new vanity was delivered with a broken top so we are waiting for a replacement. It is my preference to leave the existing vanity in place until I can essentially swap the old and the new and minimize the out of service time. But, I may go ahead regardless in the name of progress.

The only part of the process that concerns me is the plumbing. Technically speaking, each sink needs a supply shut-off. I watched some videos online that this can be done outside of the wall by removing the valve, but if I am going open things up anyway, I might as well put them where they should be.

Then there is the waste plumbing. It is not that I cannot stick things together but that I am hoping I can. Plumbing can be a fickle mistress when it comes to head pressure. There must be enough free flowing air so that a vacuum is not created and effecting the drain action. I am going to try once but I may ultimately call a plumber if it doesn’t work right the first time.

I will be honest, It is not the remodel that I really want to do. I would like to get rid of the tub and move to a dedicated shower. I would love to add a claw foot tub and redo all the tile. The problem is that we got a quote for a shower in a day outfit and it was $40,000. It was a name brand outfit and I am sure it was quality materials but not in the budget.

End Your Programming Routine: Clearly, this is not the worlds biggest project and I have concerns like I think the vanity is too close to the shower. But you know the saying happy wife, happy life. The medicine cabinet is gross and the shelves are sagging and the vanity saw it’s best days in the 1970s. Only having one sink has been a constant limitation for us when I need to shave and she needs to put in contacts. So, I do think it will be a worthwhile refresh.

August 5, 2025 – My Keg is Flat Again?

When I got my keezer (kegerator), it had one tap and therefore one keg. There is probably room for four kegs of this type inside the refrigerated space. the vessel is called a Cornelius keg, often called a ‘Corny’ keg and used by Pepsi Co. That makes a lot of used ones available in the market for whatever reason.

My strategy if you will is to have one on tap, one in waiting and one used extensively for flushing the lines. I have considered adding more taps but realistically I should not make drinking beer easier. Plus, it is a lot a work to brew and flushing the lines is often not done after use so for now, one is plenty. The point is that I have added two more kegs to the system.

Both of the kegs I have purchased were used. In fact both were also dirty. One had Mountain Dew under pressure in it. I don’t recall the second one other than to say I know it was dirty. But, I imagine that these things are not taken out of service for no reason. As a result, I have taken to having to give them a once, twice and often three times over to figure out what is wrong.

Aside from being dirty, the most common problem is leaking. Even though I have had extensive work in scientific air analysis, the tools I have at my disposal are pretty rudimentary. Most of it involves guessing and checking. The one thing that works pretty well is the soap solution looking for bubbles. The one I am showing in the picture comes from the plumbing section of a home improvement store.

You can make your own solution with dish soap and water. I don’t honestly know what the mixture is and I suppose it probably matters which detergent you use because of the factory concentration. The reason I chose to buy one is that the cap comes with a brush and so you can swab areas of interest. The one we used in the lab was a squeeze bottle with a tube at the nozzle so you could really target small areas but it is $25 a bottle.

I think it is pretty obvious how you know that there is a leak. That being said, how did I know? I opened the tap handle and nothing came out. Normal keg pressures should be around 15psi and there should be enough pressure in the vessel to fill a cup without the source pressure on (again laziness about the proper steps). But if I did things right, you should not hear gas going into the keg when you turn the cylinder valve because everything should be at equilibrium in this closed system.

When it comes to troubleshooting this system, the distribution line likely only needs to be checked once for leak Go to each break in the line and swab the joint under pressure. If it leaks, that joint will need to be tightened (only occasionally loosened depending on the connection type but beyond the scope of this article). Honestly, I only do this if during my initial test, I lose pressure. This is called ruling out the variables.

By far and away the most frequent failure parts are the action parts. These are things like valves and O-rings that seal connections. If no leaks are found around the valve, then try replacing O-rings. These are designed as replaceable parts anyway and it could have gotten damaged during transit or worn from heavy use. If your vessel leaks, then it is almost certainly junk unless you can weld on stainless steel.

I found that on my keg in the picture above was leaking around the main seal O-ring. Even my soap test did not reveal the leak and it would occur over the span of three days or so. I also knew that my O-rings on the valves were OK because the keg leaked whether it was connected to the distribution line or not. Other kegs I have did not leak and so it wasn’t the other end of the connection either.

Generally speaking, these tests should be done under system pressure. This should reduce the risk of contamination from the soap. Cranking up the pressure should make leaks more obvious but it is possible to cause new problems, so be careful. The one thing that I also wanted to add with soap is to make sure product surfaces are cleaned after testing unless you like soapy beer.

End Your Programming Routine: This troubleshooting technique works for beer kegs, water lines, air lines etc. In plumbing, lines are pressurized to prove that they are solidly connected (generally new construction). One final thing, the air molecules are generally smaller than liquid water, so a leak in an air line is much more likely than a water line. So-so connections can still hold water that don’t stand a chance containing gasses for long term.

July 15, 2025 – Summer Projects 2

I had a great idea for my wife’s 50th birthday. It has taken 32 years for her to warm up a tiny bit to firearms. I have never been involved in any crimes and nobody has gotten injured when I am around. She has finally come around to recreational shooting can be a lot of fun. I thought that I would buy her a really nice looking 22 rifle. That is until she wanted to redo the bathroom to the tune of $2000 for her birthday. How can I deny that?

The bathroom wasn’t exactly the bathroom. It also included replacing all of the light fixtures in our bedroom. We had a free day during the weekend of the fourth, that is hard to believe so I took on the task of replacing the fixtures.

I really didn’t want to do it, my hand and arm are still hurting quite a bit. The fixtures we replaced a week earlier, I tried to instruct my son and wife on how to do the job. I am sad to say that he ran off saying that it was impossible and I ended up doing at least half of the job. I decided that I didn’t need the aggravation of trying to get help. It was more pain than my arm.

I definitely won’t argue that the the old fixtures were dated. They were stamped 1999 and they had a Victorian brass look. They had already been updated once by replacing the globes from Victorian flowers to clear. Despite the fact that these new fixtures do look updated, every single one we have replaced has been a downgrade in light the fixtures put out.

My son’s fan went from four full sized lightbulbs to two small base bulbs. The sconces in the living room went from clear glass to shaded. An now the fixtures in our bedroom went from full size bulbs to small base bulbs. I guess that this is the only thing that bothers me is that fixtures are purchased by how they look and not by what they do. But, if this is the only problem then I will just put up with it.

At least a victory I can celebrate is that my wife agreed with me that it would be best to wait until the winter season to do the dry wall finishing from the rot repair and new window that was installed. I think that it is prudent not to spend a bunch of time repairing when I am not 100% confident that the leak is resolved.

I don’t know that I would call this a project but I recently purchased new wheels and tires for my pickup. I have needed new tires for quite a while. The problem was that the wheels were chrome coated and the chrome is what seals the inside of the tire. Over the years, that chrome has started to crack and therefore leak. It is very slow no doubt, about it but it causes the tires to be run on low pressure and wear the tires out prematurely.

I have had the local tire shop seal the inside of the wheel but they said that they have done all they can do. It is not an expense that I really wanted to make but this old pickup deserves some love. I have done very little in the 22 years I have owned it and things are starting to wear out. Now that my son will be gone in the fall, I plan on taking it out hunting this year as well. That is not to mention that I am also going to need it when I go get dirt for my fall season platers.

End Your Programming Routine: With summer ticking by at a breakneck pace, it is time to be buttoning things up as much as possible. There is still plenty to do for sure but if I gauge my progress I think that I am on track to get everything done. That is good because checking things off of my list makes me happy.

July 9, 2025 – Check One Thing Off the List

You can see the finished product of the rot repair and the window installation. What I see is a little bit of painting that needs to be done. The unfortunate part is that all three colors need to be painted and I have pretty much used all of the gray. That means a trip to Sherwin Williams to get some more paint. This would be the first time I have had to buy that color since we have painted our house about ten years ago (Wow, I cant believe it has been that long).

I can no longer call myself a paint insider since it has been over twenty years since I have worked in the industry. At one time, I used to know all of the movers and shakers in the industry. I might have even known too much about it. This is not a nation wide endorsement, but I prefer Sherwin Williams because I knew the head chemist and I knew that they had a Pacific Northwest test facility.

There were also some local companies making paint. But, like I said I knew all the movers and shakers which means I knew the strengths and weaknesses. Clearly locals were going to have some sort of local testing, but we have specific performance needs in the Pacific Northwest. The same would be true in the desert southwest or the Midwest or anywhere else for that matter.

That is a long way of saying that I believe in paint that has local test facilities, not all brands do. What these test facilities do is generate long term data with formulations. We are concerned with bleaching and mildew resistance. Generally speaking, price is an indicator of quality. Quality is defined by longevity, ease of application and coverage ability. I will talk about that a little bit.

Longevity to me is first will the paint stay on the substrate once it is down. Some of the problems I have seen are thing like alligatoring where the paint flakes off over time. There is also chalking, where the surface becomes chalky causing adherence problems and is more of an oil based problem. Yellowing or fading has to do with the composition of the paint.

What I mean by ease of application is more about prep than actually painting. A line like Super Paint from Sherwin Williams is a primer and paint combined. This eliminates the requirements to prime first (at least on bare wood). But, also can it paint on oil based gloss or does that have to be sanded or removed. I really don’t advise this but I watched the painter paint over moss and mildew and it still looks good today (from a distance).

Coverage ability is not just how much square footage a gallon will go but also how many coats do you need. When painting our house, we did most of it in Super Paint because it is cheaper than the line up Resilience. But, that step up would allow complete one coat coverage. When they sprayed the house in dark blue, they didn’t bother with covering the trim because one roller coat of white was perfectly fine. You pay for that because Resilience is 50% more expensive than Super Paint.

I know, this kind of sounds like a Sherwin Williams commercial. I have confidence that there are some other brands out there that perform just as well, this is what I am familiar and comfortable with. I would highly advise buying your paint from a paint store and not a box store. While the prices might be similar at each, the products are not. You are just going to get a better product at a paint store for similar money. And this stuff is not cheap. One gallon of Super Paint at list price is $85.

Since I painted my house with Super Paint and the work was new, I simply painted. No other prep was involved. That was a major labor saver.

End Your Programming Routine: I got the painting done in about four hours, all three colors and I even painted over some of the ten year old sections to make sure the color stayed even. I have painted a lot of houses over the years. I really wouldn’t want it as a career, but there can definitely be some zen in it. Unlike most building materials, paint is one thing that has improved over the years. And, it always feels good to check something off the list.

July 2, 2025 – Summer Projects

For the last couple of weeks, stuff has been piling up in our foyer. The reality is that a lot of these projects are not really necessary but as my wife is fond of saying, ‘happy wife, happy life’. It doesn’t say that much for me, but the optional things are relatively easy. It is the necessary ones that are going to be a lot more work.

We have lived in this house over 20 years. That entire time, we have had a heat pump downstairs but no air conditioning upstairs. We had our bedroom upstairs for at least 13 of those years and the truth be told, I only found a handful of days a year to be too hot. Nevertheless, we are having house guests in a couple of weeks. My wife wanted to ensure they were comfortable.

I suppose where it finally cracked, my son’s room is south facing. I won’t lie that it does get hot. But, over the years he has declined the offer for air conditioning. Our exchange student was staying in my son’s room and he spent several nights sleeping downstairs in May when we were in the 90s. Now that he is gone, we are cleaning up the remnants and my son is moving back into his room. It is the perfect time to get the new AC unit installed. I have a second one to install in the upstairs family room.

Speaking of my son’s room, he is also getting a new ceiling fan. My wife says that it needs to be replaced because it is old. What? Remember ‘happy wife, happy life’. The truth is the pull string has been broken pretty short. The reason is the kids would jump off the bed and pull on it breaking it. I know because I have caught them doing it.

This could be repaired for a couple of dollars; I have also done that before. But, it is best not to fight it. I have to say it does look new and more contemporary. The new fan is significantly inferior to the old one. This one has two lightbulbs where the other one had four. Also, the access to remove the globe requires you to reach your fingers up and over the metal fixture, inside of a channel.

The worst part is that I had to completely take the whole fan apart twice. Once because the blade was rubbing on the switch. After that was fixed, I found out that one of the supply wires was rubbing on the fan motor. That is done now.

Now that we have had the dry rot repaired and the new windows are installed, that has spawned two projects. The first is all of the replacement work has to be painted on the exterior. The second project is that I need to do drywall finishing on the inside.

I guess that because those are separate trades, then that is why they do them. It does seem like for two days of work and $5000 in labor that I would have a week’s worth of effort to finish. They did do the initial mud and tape job and it was pretty sloppy, so they did me a favor by stopping and not charging me more.

But wait, there is more. For my wife’s birthday (and anniversary) she want’s a new vanity and light fixtures in the bathroom, bedroom and dining room. This definitely makes my shopping easier but I already had a plan for what I wanted to buy. Now, I am going to have quite a bit of work to get all of this work done. Keep using the phrase ‘happy wife, happy life’.

I think that is enough to do this summer. As I have already stated in my podcast there is still plenty going on in life the summer as well. I am assuming that I can complete all that in the summer time frame. You can expect that there will be periodic updates on all of the work. The fan and AC are done now, at least my foyer is clear of boxes at this point for now.

End Your Programming Routine: We are currently in a holding pattern for cancer treatment. There have been some mixed results on the testing and so the doctors want to wait and retest in a few months. My wife really wanted to wait until the fall to get started anyway, looks like there will be no choice now. Hopefully, I can get the projects finished before my life is turned upside down again.

May 13, 2025 – Fix Your Refrigerator/Freezer Shelf

I have made these shelf fixes more often than I would care to count. Fortunately, the parts are often still available. Search the internet for your model of appliance and you will hopefully get a number of vendor options. You may find OEM options as well as secondary markets. While this fix is easy, it unfortunately is not cheap with OEM parts.

May 6, 2025 – Kids…

“I don’t know what happened, it just stopped working”. Huh, I have no idea. I guess that I will take a look and see if I can see anything. Oh, I see there is a bunch of sand in here that does not belong.

In years past, I have replaced a few RAM DIMMs, hard drives, disk drives, and the like. That doesn’t make me and expert in PC repair, it makes me a part swapper that has a little knowledge of what things are inside of the cover. Years ago, the motherboard would sometimes have some diagnostic LEDs as well as speaker beeps. The combination of those two tools would help steer you in the right direction.

I haven’t seen this problem in years but every so often, the motherboard battery would die and the PC would act like a failed hard drive. It seems like those batteries never die today, at least I haven’t dealt with it in my batch of ancient PCs. Once again, the onboard diagnostics were very helpful in resolving quickly.

When my son said that his computer makes a constant crackling noise and doesn’t stay connected to Wi-Fi, my first thought was that he dropped the thing and there was a loose connection. Dropping electronics is a very common occurrence that never happens with kids either.

Where to start with these things? I just turned it on. I noticed that there were a lot of updates that needed to be applied. That got me thinking about drivers. Sometimes not having the right driver installed can even have wildly erratic behavior. I didn’t see any driver updates that needed to be made. That did not make any sense.

First, this PC had not been on my network since before I made all of the upgrades in March. The location of his room was notoriously spotty because I fought with doorbell many times and his room is directly above that. I signed the computer into the network with new credentials and things seemed pretty stable. I think the Wi-Fi stability was just a phantom problem of a weak network signal.

Now to the crackling noise. It sounded like a static-y AM radio station at times. Although my son said it was happening constantly, I only heard it about five times in fifteen minutes for a couple of seconds. He said that it was much improved. I figured I would just let all the updates install and see what happened from there.

Meanwhile, I did some research into the internet. It seems like this problem is not unique. In all of my years as IT manager, I have never heard of it. Despite all of the claims of high dollar sound cards and meticulous checking of connections and power, most of the claims were resolved by disabling sound components in device management. I still think I need to get under the covers of this machine. I was still under the impression that it might have been dropped and has loose speaker connections.

When I took the back cover off, viola. Sand contains conductive material and at the very least, it doesn’t belong inside of a computer case. I took the compressed air to the motherboard and speakers and everywhere I can reach to blow it out. In hindsight, I think a vacuum is probably the best first approach because blowing the sand around risks jamming the particles deeper in the machine. When I turned it on, the crackling was gone.

End Your Programming Routine: When approaching a problem that is new or unusual, the first step is to take a look. Whether it is automobiles or CBs, it is amazing what the human can recognize as ‘not quite right’ even if you do not know how to fix the problem. In this case anybody other than a blind person should be able to recognize that sand doesn’t belong in a computer. In the future, I will be more insistent on making sure that my son performs basic troubleshooting steps before I get involved. This is how we combat a culture of ‘call a guy’ from completely taking over.

April 29, 2025 – He Who Smelt It, Didn’t Fix It

Bathroom fans are a dubious proposition. We want industrial hood suction with a consumer level price and engineering. I for one am somewhat skeptical on their effectiveness as it seems like fan off/on seem to have the same results. This particular fixture has always had weak lighting and now the fan has stopped working. It may be worth trying to diagnose but an upgrade in lighting is certainly in order.

I am amazed at the number of options today. When I was last looking at fans a couple of years ago there were a handful of choices. I didn’t buy one because the volume I wanted was on backorder. Those choices were largely based on fan volume. Today, there is a whole isle of bathroom fans. Later I learned that there was nothing wrong with the fan at all and what I thought was a bearing was a loose cover connection.

I have replaced this fan once before, so I am confident that this job is easier than it could be. If your fan is original to the house, your job is going to be much tougher as it is likely attached to the structure in a way that is not accessible from the finished space. This means that you will have to come up with a way to cut and chop your way through the fan body to get it removed.

I suspect that this fan overheated due to dust (or see below). The easiest fix would be to simply replace the fan motor. In our case, the light is so poor that we are going to upgrade the fixture. Replacing the motor is about an hour job, replacing the whole fan, box and all is probably an eight hour job including multiple days of finish work.

I did find out when I took the box out that a squirrel had made it’s way down the vent pipe and stashed a walnut in-between the flapper vent. For all I know, maybe that is what caused the fan to burn out. At the very least, this should help with heat loss and better ventilation for that matter.

Make sure the power is off. If you are confident that your wiring is conventional, then you should be able to leave it off at the switch. But, if you are not, then you will need to find the breaker. Next, remove the electrical connections. In this fan they are made underneath the plate that you see. That means that you will have to figure out how to disconnect the fan from the box. Detach the box from the framing so that it is only connected to the duct work. Finally, disconnect the duct and install in the reverse order.

Now is time for the pro tips. I did have to cut out my old fan box to remove it. I was not expecting that but it had to do with the wiring clamped outside the box. Second, I did have to modify the new fan. The first modification was that I cut the new work tabs off of the box so it would fit in the hole. The second modification I had to make was I had to disassemble the entire fan to make the electrical connections. There is no way to use a wire clamp (middle picture) when the box is in place. None of that is in the instructions. Finally, the new fan box is quite a bit smaller than the one that it replaced. That means that there is drywall repair to be done. I am still working on that as I type this.

End Your Programming Routine: I have to be honest, this job requires a lot of different skills such as electrical, HVAC and drywall finishing. If you could find someone to do the work at a fixed rate, you would probably time ahead unless you are pretty darn good. Since I had done this a number of times, I thought it would go quicker than it did. And even though I can handle it I found myself frustrated at points and sweating a lot.

March 25, 2025 – You Bast**d

This project has become way too complicated considering my starting point. I already had the wire on both ends of the wireless bridge. One of them was already terminated and powered. It should have been as simple as pointing the two devices at each other, terminate the other and… go.

After I got the one wire terminated (see last week), it was dead. I rebooted and reset each unit and then they connected. So, I plugged my computer in with ethernet cable and things were great. I was done. Two hours later, the router was flashing red. I rebooted them multiple times and no connection.

I moved the wireless router back into the original position and then I spent an evening wiring up the outside router again to try and bridge the lack of reliable connection of mesh routers between buildings. My operating theory was that the overhead, yard light strings were enough of an obstruction that maybe I would need to raise the wireless bridge on my house to clear all of the things in the way.

My Life Below Zero watching has influenced me quite a bit. I realized that I put off a lot of things because of weather. So I went outside and raised one wireless bridge in the rain. I aimed a laser to make sure that they were pointing to each other. Even though I had to re-wire the basement because I stole all the length of the cable to raise it, all the ladder work was done.

The next day, I finished the wiring. I went outside to check the power indicator lights and the hose clamp that was holding the wireless bridge unit to the mounting fixture was snapped. The wireless bridge was dangling by the ethernet cable. Back out came the extension ladder. I had to go to the store to get more hose clamps because I didn’t have any replacements. But, that was OK because my remaining length of cable was 12 feet too short to finish the run as well.

I had to take the significantly longer trip to Home Depot because my local hardware store does not carry bulk Category 6 cable. When I got back, I quickly ginned up the remaining cable and tested for connection. The two bridge units were talking. But, I had committed to making Ramen that night and I needed the time so I had to stop there. I had nothing left after cooking for three hours.

I know the question that you are asking, has this effort been worth it? As of right now, the units have been up for over a week and they are still not working. I have tried to check all the things on my side and am waiting for a response from customer service for various technical reasons. From the reviews I have read, I am suspecting that they will send replacement units.

The manufacturer claims that these units are paired from the factory. Like all things of ignorance, I used the wrong units for each side and so I had to re-program them. All of the issues that have happened made this project much more difficult than it should have been and are possibly part of the connection problem. I doubt it, but I cannot rule it out.

Based on my knowledge and experience, I possibly mis-judged the complexity of the job. While it is a 50/50 probability that you will put up the wrong units like I did, somebody without my experience would be stuck. I could have just as easily picked the right unit with line of sight. This all presupposes that there is nothing wrong with the units (which I highly suspect).

What I am trying to say is that if your networking and troubleshooting skills are low, it very well might work on the first go. If I would have read the user manual more carefully before I started, I would have tested them on the ground before I started. I would have installed the units in the right order. I probably would have placed them where I originally did but I would have eliminated a lot of the noise that is frustrating me. But if they are not, it could be very difficult to do successfully. In that situation, I would recommend professional installation.

I think that I have eliminated all of the wireless complaining in my house now. Aside from getting this wireless bridge working, there are additional touches to add. Are there dead spots that we frequent outside to place the outdoor unit? Does that take the place of another unit indoors? Each ripple causes another smaller one.

End Your Programming Routine: As you can see, this project is probably never done. The range extender I didn’t talk about could be utilized, I am thinking my shop area. Eventually, my wife is going to want another camera in the driveway area where I have no coverage. And so it keeps going. Hopefully the next ones are not nearly as difficult as the one that is basically done.