Category: Projects

December 20, 2022 – Fly Tying Basics

I am not tying flies yet. Let’s see if I can shake the cobwebs off enough to get started. On my 18th birthday, I got a class where my dad and I went to a fly tying class for a term. That was a few weeks shy of thirty years ago, I think that was close to the last time I did this. The good news is that this is no longer a dark art. With YouTube and websites, the information should be readily available. I still have my old manuals too.

I suppose the good news is that this is not expensive to get into. Some of the introduction kits are around $50 and have everything that you need to start and move on from there. Even the supplies are pretty inexpensive. But a word of warning, as with all fishing tackle, some things are hot at particular location and/or time. It really is best to tie for the situation and not just amass a huge pie of potentially useless flies (unless you just like doing it).

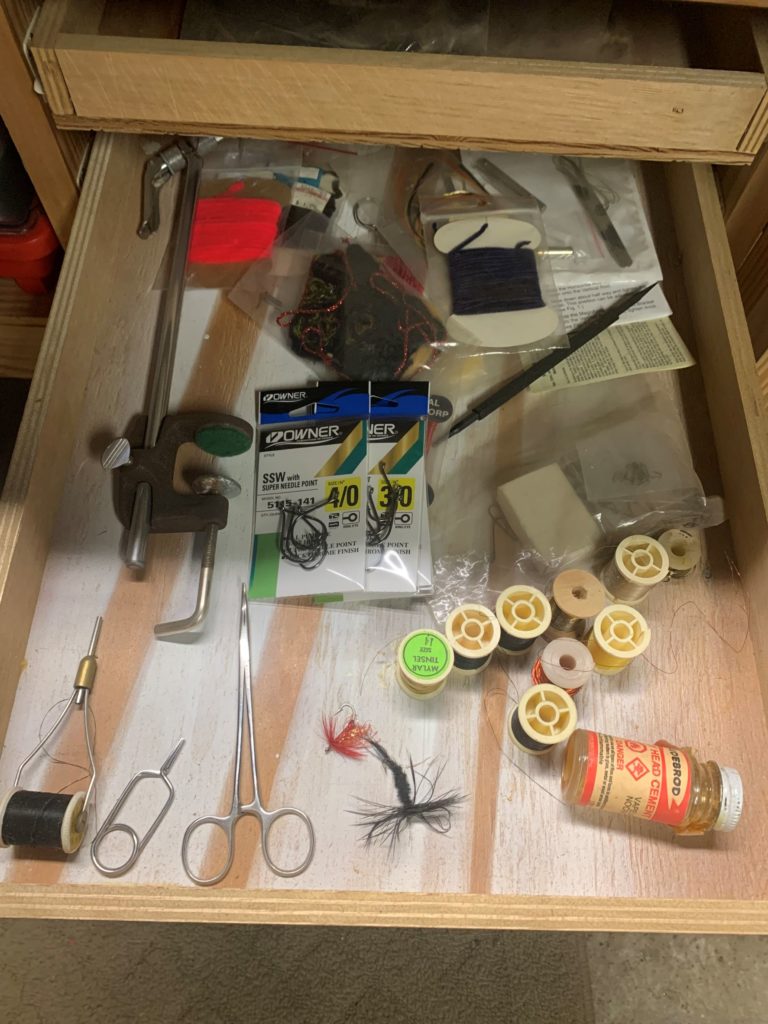
What I am showing in the picture above is the result of two kits plus some additions. Without much ado, here are the required items.

  • Vise
  • thread
  • fish hooks
  • scissors or X-acto knife
  • materials appropriate to the pattern.

These are the strongly helpful items

  • bobbin
  • hackle pliers
  • head cement

That is it. It is really not that difficult to get started as long as your dexterity is reasonable, you have an adequate workspace with light and space. Some people use a repurposed desk, I am using a dedicated bench, I have tied plenty of flies at the kitchen table and even a card table in front of the TV.

There is more to know with materials, but I think that I will save that for another day. With that, you cannot really separate flies and fishing because that is the whole point. So, I am going to cover some terms that you will come across.

  • Wet Fly – This a a whole class of flies that are meant to spend time under the water.
    • Nymph – this is a type of wet fly that simulates a larva
    • Emerger – This type of fly is when the larva is changing into an adult
    • Streamer – This is a flashy wet fly used in steelhead fishing
  • Dry Fly – This is a whole class of flies that are meant to float on the water. This would be the classic fly.
  • Popper – these are flies that make noise. They are wet flies but make a sound when you are stripping them back in. Bass plugs do this as well.

The world of fly fishing can be confusing because they use some of the same equipment as conventional angling, but call them different names. For instance conventional fishing would call this item a ‘bobber’ while in fly fishing, it is called an ‘indicator’. I think that this is part of why fly fishing appears pretentious along with the catch and release ethic among other things.

A dry fly traditionally used natural materials like hair and feathers. It seems like the whole movement has loosened up quite a bit with flies called ‘dirty flies’. They might have suggestive names or they may be made of any kind of material. This is things like craft materials or rubber legs and things significantly departing from hair and feathers. I guess what I am trying to say is that what used to be very rigid rules about what to wear, what to use and how to do it seem like it is slowly changing.

I have always liked streamers. These flamboyant flies are imitating baitfish. This is where I am going to start because it uses a big hook. This will give me opportunity to practice technique at the same time I have some room to work.

End Your Programming Routine: Next stop, actually tying flies. Of course as I said at the beginning, these first couple are just to get my head right. I am not going to worry about them actually being fishable. That means the right fly for the fish and environment. I think for 2023, I am going to set a goal of catching a fish on a fly that I have tied. I should say try to catch a fish on a fly that I tied.

December 6, 2022 – It Is Good To Have Stuff

Have you heard that you can be owned by your stuff? As a preparedness minded person, I definitely have more stuff than I need because I have duplicates of a lot of tools and an inventory of supplies and consumables. That being said, I am also frugal when it comes to many things.

So for instance both of my vehicles have been paid off for five years. I am not looking forward to another car payment. Just looking, it seems like we will have significant payments for a reasonably new car ($800/mo). I am delaying as long as possible. But, my Lincoln Navigator is showing some problems. There is some sort of electric draw that is killing the battery overnight.

As a good preparedness person, I have a battery jumper, jumper cables, battery chargers etc. My first go to is the jumper. It requires the least amount of effort to start the car. But, my jumper is anemic. I think I looked up and it only has 300 cold cranking amps. My car battery is 700 cold cranking amps, so a true dead battery isn’t touched by the jump pack. Having dawdled around with this for a number of situations, I really need to get a bigger jump pack.

When I went to go plug this unit back in to keep the battery charged, the cord arced. Upon closer inspection, the molded plug was severed nearly in half. On closer inspection, both sides had visible wire when the cord was bend ninety degrees to the attached end.. This wasn’t sabotage, but cheap materials. I think in the cold shop, the plastic insulation on the outside of the wire cracked to the point that the wires were exposed. In the photo below, if you look carefully you can see the exposed wires on the male end of the plug.

Now what? Good luck finding a replacement cord for a no-name jump pack that is 8-10 years old. I know, I will repair it if I can. Fortunately, I found the right male/female replacement ends for a total of $7. Incidentally, while browsing for an upgraded jump pack, I found a replacement cord for $10. The advantage to my strategy (repair) is that I know these parts will fit because I have already tested them.

This is not a hard process but there are a couple of tricks. The hardest part is figuring out how to disassemble the replacement plugs. But the first thing is to keep the polarity of the plug on the right (or same) side. Some cords have a stripe down one of the wires, this one has a rib. Said another way, in this cable one wire is ribbed the other is smooth.

It doesn’t matter which side you pick but stay consistent, especially if you are only replacing one plug. The neutral on a two wire setup is the bigger of the two prongs (or holes). The neutral on the male end should end up as the neutral on the female end of the plug.

There is a saying in electrical ‘Black on Brass’. Black is the typical color of the hot wire. White is the typical color of the neutral. If there is a choice of materials, the hot wire should land on the brass connector. I don’t know this as a fact but I think that brass probably has better heat resistance and therefore resists a screw backing out better than aluminum or steel.

With these particular replacements, they came with two different colored connectors. So, I chose the ribbed wire as the neutral and connected each end to the silver side. The other side were connected to the brass terminals. That is it, the cord is repaired.

End Your Programming Routine: Since this unit has proven nearly useless as a jumper (on my vehicles), it doesn’t mean it can’t be useful. For instance, it makes a hell of a phone/tablet/computer charger. So, I am in the market for a more appropriately sized jumper but now that this is going again I am going to keep it around as two are one.

November 29, 2022 – Learning New Things From Self Reliance Magazine

I have written about my interest in the Self-Reliance/Backwoods Home publishing universe. Currently, I am buying them as add-on’s when I go buy pet food at the local farm store. I very well may end up subscribing but I am still evaluating the situation because no one wants a magazine subscription where you know all the content. I guess I shouldn’t be surprised but I was when I read the Fall issue of Self-Reliance magazine I found some things that I didn’t know or wanted to pursue.

The second article was about how to save seeds from tomatoes. I literally have tomato setting on my desk that I am going to attempt to do this. If you remember from the spring, I had one plant that survived under the lights of my starting. I have planned all along trying to propagate this plant because maybe it has the secret sauce to withstand my abuse.

The fourth article was about building rain barrels. This is another thing that I want to do in the late winter or early spring next year. The reason that I want to do this is to have a water source near my greenhouse. I am hoping that by making things more convenient, it will empower these endeavors to be more productive.

About 2/3’s of the way through, there was an article about using scraps. What they were advocating were making jelly from peach or pear peels. The article also claimed that tomato paste could be made from the skins of tomatoes (after juicing or saucing). There is something called watermelon pickles where you pickle the white part of the watermelon. I had no idea, and I thought that I knew all the frugal tips.

Finally, there is an article on learning how to arc weld. I literally have my dad’s welder in my shop. It is the same model as the article and it is something that I have wanted to learn. We borrowed it work on my son’s projects and kind of muddled through it. But still, talk about being on the same page.

There were some other interesting and useful things in this issue but not to the same scale of symbiosis. So, if you recall from my last review, I was less enamored with Self-Reliance than I was with Backwoods Home. For some reason, the Fall issue of Backwoods Home never made it to the news stands. I have the Winter one that I am waiting to read in a break from Atlas Shrugged. But, this reinforced my thoughts that subscribing in a bundle is the right way to go.

End Your Programming Routine: I am really glad that I gave this title a second chance. I don’t think the information is as comprehensive as I would like, but I get it. You are probably not going to want to read a ten page article on saving tomato seeds. The basic technique is conveyed in one page. I am OK with it having a little gray area because that is how we learn. We take what we know and think about what we don’t to come up with a method that works for us.

November 16, 2022 – Disorganization is Driving Me Nuts

A number of years ago, I cobbled a shelf together out of scrap material. The purpose was to organize all of the picnic materials (mostly used with the barbeque). Hence, I hung it above the barbeque in the garage. My first version worked, but it ended up sagging a lot. About three years ago I took it down and re-enforced the sagging shelf.

Something happened while we were in Barcelona. Because when I opened the garage when we got back, I saw the shelf was partially detached from the wall and over half of the items were on the floor. I hastily stacked everything on the floor and subsequently tripped over them and cursed their existence all summer long.

The failure of the old shelf appears that the back, which was nailed into the plywood shelves had separated. Hence, the shelf sort of fell apart. Now, I don’t think it just fell apart on it’s own. but regardless I would say that it wasn’t constructed properly. Any sort of shelf backing, the purpose is really to prevent racking, not necessarily hanging. I am a little surprised that it failed despite realizing the actual weaknesses.

Now that the fall is here and so is the rain, it is time to start shop projects and inside projects. It is also time to stop getting angry every time I try to maneuver in the garage (which is several times a day). I was going to build the shelf that never failed. About a day later, I decided that I was going to get this done as cheaply and quickly as possible.

I was at the local box store and I saw shelf brackets for $4 a piece. I bought four of them thinking I would hang one shelf and try them out. The worst case scenario is that I would save them for some other project later if I thought they were too wimpy. With the World Series on in the background, I set about disassembling the former shelf. I took measurements and pulled nails.

In about two hours, I had the first shelf up and loaded it up with paper plates, Solo cups, aluminum pans etc. I had determined that this was going to be far more cost and time effective to use these brackets rather than buy lumber and build my forever shelves. Over all, I bought 8 brackets (x $4) or $32 plus about four hours total of labor.

The point here is that it kind of offends my sensibilities to use the shelf brackets rather than build something. But, from a standpoint of time savings and even cost, this is no comparison to what I should do. The work is done and the stuff is off the floor after months.

End You Programming Routine: A friend of mine used this term ‘minimal viable product’. What it means is the minimal amount of effort exerted to do the job is the most efficient. This doesn’t necessarily mean do a temporary job, but it also means don’t overthink it. Variables always change in the future and the paradigms of today are not necessarily valid tomorrow. So, trying to futureproof something is often futile.

October 26, 2022 – The One Thing That Didn’t Get Done This Season

The Fall has finally arrived. We had an extraordinary extended summer that lasted three weeks into October. I have never seen this before. The truth is I feel I was lucky to get more than the siding done in the first place. But, I had hope that I could squeeze in staining the deck railing in September.

Of course, some choices I made and compromises on other priorities effected my ability to squeeze it in. I choose to go to the range in September and October. My wife wanted new doors and a window installed. A lot got done, just not the railing. It’s one of those things that started with giving the wood a few weeks to dry out that turned into no time left to complete.

But, it’s OK. I don’t regret taking some time for what I want to do. It wasn’t worth arguing with my spouse on what she wanted done. What I am trying to say is that we all have things that didn’t get done. Hopefully, they are things that have justifiable reasons like mine.

I really didn’t think I was going to write this much on that situation. What I had intended to do was talk about water based vs. oil based stains. When it comes to decks or outdoor exposure, there are no winners here. No single coating type can withstand year over year water and traffic and look good. So, we need to accept the limitations and look at the pros and cons.

One choice to make is do nothing at all. In my area of the country, pressure treated wood is made out of hemlock, whereas a large area of the country pressure treated is southern yellow pine. The two are distinctly different in appearance, hemlock pressure treated wood is very rough due to the process. In my opinion, it is best left alone or treated with a solid stain or paint (more on that later). Woods like cedar and redwood weather gracefully and do not need protection to last for years.

Eventually, they will start to get rough as water raises the grain repeatedly. The use of stain will extend the life of the wood for much longer. So let us look at the two choices. Water based uses water as the carrier for the resin. Imagine millions of little balls floating around. As the water evaporates, the balls get closer and closer until they touch and eventually become one. This leads water based coatings to form a film.

With oil based, the resin is dissolved (not really, but close enough). This allows it to penetrate into the wood. As the solvent evaporates the resin sets with contact to oxygen which causes it to ‘harden up’. I am ignoring things like epoxy coatings and water based alkyds (alkyd is the type of polymer that is used in oil based) and all kinds of other technology like silicones (ABC’s Water Seal).

Film forming (water based) versus penetrating (oil based) are the largest performance differentiators. Film forming has the best overall durability and protection. The major downside is that once failed, recoating must be done with water based and my observation is that the films tend to peel. This causes recoating to be less than satisfactory.

Oil based tends to have significantly less durability. Typically I see one to three years maximum. The primary advantage is recoating is significantly easier because there is no peeling. I also think that oil looks the best. So, this is the solution that I chose.

Of course, I would be remised to not mention the clean-up aspect. There is no doubt in my mind that that I would have started and did a couple hours a day if I wasn’t afraid of the pain in the butt it is to clean oil based brushes and supplies. That is how I work primarily, finding full weekends is almost next to impossible. When I go to tackle this next year, I will just have to jump in and deal with the consequences.

I can’t recommend brands because I am not familiar with the choices. I did sit through some marketing oriented reviews and it seemed like there were some repeat brands that showed up. I would recommend seeking advice from a paint store rather than a box store or even contractors. I didn’t buy from my favorite paint store because consumer reports gave it terrible reviews so I went with a brand that came up as best in category in several different reviews.

Remember, price is an indicator of performance. $30/gallon has different expectations than $200/gallon in my book. Lastly, lumber from the lumber yard has about 20% moisture content unless it is pressure treated and then it is significantly more. It needs a few weeks to dry out for a proper application of coatings. Even though most films are breathable, meaning moisture can get out (as well as in; ever seen something painted and rotten at the same time?), you want the best mechanical bond you can get so the film doesn’t flake off. That doesn’t happen when something like water vapor is pushing the opposite direction or moving the grain underneath.

End Your Programming Routine: The solution here is complicated with no good choices. The truth is this is why I chose to use synthetic decking in the first place. I already said that I was going with oil for the railing for looks and future maintenance. That being said, if I was going for a solid stain, I would probably have chosen a water based product.

October 12, 2022 – Installing a Replacement Window

Do you wonder why I talk about flashing so much? I mean, who doesn’t like to see a good, quality flash? I know what you are thinking and yes I am trying to joke around a little bit. But, seriously, flashing is the key to a quality job. There are tons of videos out there to show how to do this properly. Just remember, think like a raindrop.

There are three ways to go about this job. The first is to order replacement windows. This is essentially a widow without a nailing flange and the idea is that you remove the old window the one pops into the hole. This does not disturb the existing siding and trim assuming the window you are replacing does not have a nailing flange already and all of those details are in good condition

The second way to do it is to buy a new window and cut the nailing flange off with something like a reciprocating saw. This simulates a replacement window at usually significantly less cost. Then there is the right way. That is to cut off the siding and trim so that the window and opening can be flashed appropriately.

The window that I was actually replacing was used when I purchased it. Someone had already cut the flange off. I bought it second hand for $40 and I tried to make it water tight. It was a fine window, but my wife wanted a window that actually opened so that we could install a portable air conditioner in the future (actually this year, but it is already October so we won’t see those kind of temperatures again until next summer).

Out went the window. The next thing you want to do is prep the opening. I really like this self sealing membrane product. It is sold in the area of windows, it is really sticky and it seals around nails and punctures. You want to flash around the window opening to protect the framing from getting wet. If this is a replacement, you want your flashing to hang over the house wrap so that any water that might get behind the window stays on the outside of the wood.

Start at the bottom and work around the opening. Here is a link from someone doing it right. Note, there are some slightly different techniques but they all are a variation of the same thing. After the flashing, set the window into the hole as centered as possible. Just like doors, do everything you can so that the window is square and plumb.

If that is true, nail in the window. I like a 2″ roofing nail, nailed every other hole on the flange. The point is to get the window nailed into the structure and two inches is enough to get through the window and the sheathing and get enough grab into the structure. Now, you want to flash over the flange to keep all water on the outside of the house wrap.

Believe it or not, when siding the very next thing you would do is the window trim before the siding. This is because the trim and the siding mate with a caulk bead. I have come to the conclusion that these should also be flashed with metal or membrane but I didn’t do it here because I would have to pry all the siding loose so that I could slide flashing underneath. I reused and installed the trim in the reverse order I took it off.

The takeaways here are 1) order an appropriate window 2) install it plumb and square 3) flash the opening properly before and after. If you do these three things, then you will have a successful replacement. Obviously I didn’t cover everything, you may have to remove the interior trim for instance. I also typically use a 6″ tape. Mostly, I split it in half because this is some expensive stuff.

End Your Programming Routine: I bought this window on the same day as I bought the front door. So, it has been in the queue for a little bit. The weather has really cooperated so that I could do all the things I have wanted to finish before fall/winter set in. Once the trim is in, it is time for the fussy part of caulking and painting. but that is it, Take you time, have a stable work area, watch some videos and think before you act, you can do it.

October 5, 2022 – Modifying a Door to Fit in an Existing Frame

Sometimes new doors are called ‘slabs’ but this also works for used doors. The most important aspect is the measurements. Precise measuring will mean the difference between fitting and not fitting as well as operating properly.

  1. Measure the dimensions of the existing door and the one that you are wanting to replace. It probably goes without saying, but if your replacement door is smaller than the one you are replacing, this isn’t going to work unless you can figure out some sort of weather stripping to seal the gap.
  2. Pick a reference point to measure. I like the top, hinge side corner. Take a measurement from your reference point to the top and bottom of each hinge. Also measure the top and bottom of your lock set holes. This is for both doors.
  3. Now it is time to do some figuring. Is it possible for your door to fit? Does it need to be modified to do so? And if so how?

If you look at my measurements, the door wanted to use was wider and taller than the door I was replacing, check. The middle hinge was in the same spot when I measure from the top. So, my strategy was to trim the width off the hinge side and reposition the top and bottom hinges so that everything matches. Since I was measuring everything from the top corner, this gave me the freedom to trim the extra inch off the bottom without consequences.

Unlike hinges, lockset holes are a standard 2 3/8″. This means that I really didn’t have to measure the top and bottom of each hole, I elected to just go from the top of the door to the top of the hole. Note that I measured the difference between the the top of the deadbolt to the top of the operating knob. Also note that the spread is different which means that I am going to also modify the strike plate for the deadbolt to work.

For square cuts larger than an 3/16″, I opt for a circular saw to remove. But, when you start getting into tapers or real thin removals, I use a router with a straight cutting bit against a straight edge. You could also use a hand plane or even better a power plane but that is a tool that even I don’t have. I really didn’t want my hand plane to be removing fiberglass either.

After the door is sized properly, it is time to recut the hinge mortises. I use the Milescraft HingeMate 350 for a lot of extra help. This job can also be cut with a chisel, by hand if you don’t have a router. I already owned and used these templates a couple of times so of course for me it was a no brainer. I actually reviewed this product in 2020.

Despite my best efforts, I still had to modify the width after a test fit. I ended up taking another 3/16″ off the strike side. Ideally, I would have left that side alone, but this was the fastest way to get the door up as daylight was fading quickly. Because I created new fitting problems with the deadbolt and lockset. My backup plan was to put the old door back into place for the night.

End Your Programming Routine: None of this work is particularly difficult but I would say that it is not for the DIY feint of heart. If the door that you are replacing was not installed square or your holes are off, you may be in for a difficult time. You are potentially racing against time and the weather to get the door installed. So keep those things in mind before you start.

September 28, 2022 – Pre-Hung Doors

Now that we know how to take a door out, it is time to talk about adding a new door. Sorry if you were hanging on for this after the previous entry, you have now had an open hole in your structure for several weeks! I fully intended to capture the installation of the new door but got busy and forgot.

To make matters worse, I have decided to modify the existing door rather than replace the entire structure. So, I won’t document installing a pre-hung door this time. But, let’s talk about them anyway.

Things to know before buying a new door:

  1. How wide is the existing door? Typical widths are 36”, 32” and 28”. This is how the new doors will be marked for sale.
  2. What is the swing of your door? When on the outside of the door, the side of the hinges will either be left or right. That is the swing.
  3. Know your framing, for depth. Old houses like mine have true, 2×4 framing, new houses are 2×6. By the time you add 1/2″ of drywall, 1/2″ of sheathing and siding, all of this makes a difference when buying a pre hung door.
  4. Do you have a standard door (or opening)? Measure the height of the door, it should be 80″ in height. If your door is less than that, it is possible to modify the door but cutting the frame and door down but is much more work.

This is the reason that I modified the door rather than the casing.

It’s not a great picture, but the reality is the frame of the front door is half an inch wider than the current frame in the back door. The main house is framed with true dimensional lumber where as the back of the house is framed with modern lumber. Instead of 4″ thick, it is actually 3 1/2″ thick. If you have this situation, you are going to either have to cut down a door built for 2×6 walls, add onto a frame that is framed for 2×4 walls or order a custom door.

The truth is there are no good options. I made what I thought was the easiest and quickest method by trimming the door and moving the hinges. Guess what, it worked. It takes some fussiness and careful measuring but it can be done.

The nice thing about a new door is that all of the weather stripping is new. Everything should operate smoothly and easily like the handles and latches. Today, you don’t even have to mortise the lockset in many cases. This is secretly one of my least favorite things to do. If it is a used door, take the time to fix the weather stripping, paint when everything is off, make it install ready.

The next thing to having the right fitting door is to make sure that when installed it is plumb and level. The door will never operate properly if it is not. Do everything possible so that the door can be installed plumb and level including modifying the siding, drywall or structure. I can’t express the frustration you will have over the life of the door if you do not.

End Your Programming Routine: Since I cannot show the installation of the door, I will leave it at that. We got lucky in that I was able to modify both doors to make them work. It very easily could have not worked out because I wasn’t paying attention to all of the variables when my wife ordered the door. Trust me, I have made all of the mistakes before, including ordering a door that was too small for the framing, installing crooked doors that don’t function, having to add onto the structure, removing sheathing., etc.

September 7, 2022 – Removing a Pre-Hung Door Properly

My wife has been hounding me to get new doors for years. I like the look of the front door, but it has never operated the way it should. I have messed around with the lock sets and the screws holding the door in place but it is no use. It is imperative that doors are installed plumb and level for them to operate to expectations. I finally gave in and when I take a level to the exiting door, it is way out of whack. Now it the time to finally get a door that works properly.

Generally speaking, a pre-hung door is simpler to handle than just a door blank. It should be cutting the entire unit out and replacing the entire unit. Getting the entire unit plumb and level should be easier as well because the door should operate within the frame correctly.

Of course, you can always get a door out by destroying the frame. And if your door works properly, you could just replace the door and not the opening. In this case, I am going to put the front door in the back because my wife want’s a little more privacy than the current back door offers. And since it is easier to install as a unit, I am going to talk about the way to get the door out without destroying everything.

Step 1, Cut all caulk and paint lines around the trim, inside and outside the door using a utility knife. Note: in a pre-hung door, the exterior trim is typically part of the unit. Make sure it is all the way free before prying on anything.

Step 2, Carefully remove the interior trim so that it can be reinstalled.

Step 3, Locate the fastening mechanism of the door frame to the structure. Some use screws through the hinges while others are face nailed through the frame itself. If screwed, remove them. Also, consider not just the hinge side but also the strike side. Long screws are often used to secure deadbolts. If the frame is nailed, it is best to cut the nails with a reciprocating saw.

One other tip, if you can see shims in between the door frame and the structure (like the picture above, upper left corner) it is a good bet that there is a nail or screw in that spot. Shims are uses to get a solid backing to nail/screw through so that the frame stays square.

Step 4, If the frame is free on all four sides, then carefully rock the the entire assembly out of the rough opening. I find this easier to do when the door has been removed from the frame because it is a lot lighter

If all goes well, you should have a door and frame that you can use somewhere else or even donate. As an FYI, most contractors do not take a lot of respect or care for re-use. So, if you hire someone to do this job, don’t expect that you will get a re-useable result unless you specifically ask for it. Also, expect that it will cost more because being delicate takes time. I missed my chance at salvaging fence boards because they just cut the panels and threw them away before I could talk about it.

End Your Programming Routine: Sometimes things are easier said than done. For instance, it looks like there was caulk/adhesive added behind the door frame but it somehow missed the installation and therefore the door wasn’t stuck to the structure. What I would have done in that case is sacrifice the outside trim to try and keep the rest of the door frame together. Overall, this took me about two hours. I will talk about installation coming up in the future.

August 31, 2022 – Shop Siding, Before and After

It is a good thing that I am done because summer is almost over. I ended up finding more rot in the facias and I debated leaving it. Ultimately, I decided that I had everything setup and I was in the mode, so I ended up spending a full day taking care of the unexpected damage. But, it is done.

As I like to do, I thought that I would provide some project accounting. What did this project really cost?

Hardware$111
Paint$45
Siding$555
Lumber$34
$746

I did spend more than this, but they were unrelated costs to the project. They were expenses for my home and apartment that I picked up because I was already at the store. It is possible to argue that I may not spent the money if I wasn’t already purchasing project supplies.

I wish that I had kept better track of my actual hours. I should know that I am going to write about it by now. I am just going to have to make an guess at this point.

SidingDemo12
SidingSheathing/underlayment10
SidingPainting26
SidingInstallation12
SidingFinish5
SidingMaterials Purchase15
Siding Subtotal80 hrs
FaciaAll work20
Total100 hrs

My biggest labor expense was in painting. I did paint everything by hand and every exposed surface got a primer coat and two topcoats before installation with touch-up afterward. Had I installed everything then shot it with a sprayer, I am sure that I would have driven that cost down to 8 hours. I also feel like some of my trips for materials were wasteful. I had to replace the Hardi boards that broke as I was unloading and I made one trip to purchase a 15 degree finish nailer plus caulk (more on that some other day).

I am giving myself a raise on this project because of inflation. If I estimate my rate at $35/hour then my labor is $3500 and my overall cost is $4246. A smart contractor is going to add some contingency to the job, like 20%. I would estimate the overall value of the project to be $5000.

End Your Programming Routine: The project actually totaled more time than I expected. It was the painting phase that seemed to really drag on. Of course, most weekends I spent some time but not really sun up to sun down or even a straight eight hour day. The truth is, I didn’t really feel like I needed to work that way. But now, I need to move onto other things while the weather is still good. It feels good to finish however.