Category: Projects

May 20, 2020 – Don’t anyone fool you that construction demolition is fun (or easy)

I feel like the role of demolition in a project, particularly on TV is portrayed as some kind of romantic process. There is a wild, passionate throw of ideas like “we can knock this down and open that up and replace these fixtures and those sets of cabinets”. Everyone will get out their pent up aggression and an hour later will be moving on to making everything nice and new.

In the real world, that just isnt true. Demo is long, tough, tedious and dirty business. The conditions are less than ideal sometimes downright gross. Rot, mold, mildew, excrement and even dead animals are part of the discovery.

In my case, I am always mindful of ‘over’ demo. If I want to use one sheet of drywall or plywood, I am calculating precisely how far to go so as not to need one and 1/8 of a sheet. I am thoughtful that molding profile may not be easy to match again, so unless I want to redo the entire room, I need to be careful removing it. Gentle demo can take days longer.

I try to be consciences about reuse and value as well. Cabinet and fixture removals are examples of that. Habitat for humanity will take items in serviceable and good condition, but not damaged. I try to reuse wood and minimize landfill fodder as well. We burn appropriate and clean wood in our fire pit for family entertainment. That minimizes waste and maximize use, but nails and things need to be removed first.

I don’t mind swinging a sledgehammer ten times. But eight hours of prying, cutting at odd angles, hammering and wrestling sharp heavy objects quickly removes the romance. It is probably my lack of experience, but rarely does any of this go as planned or easy.

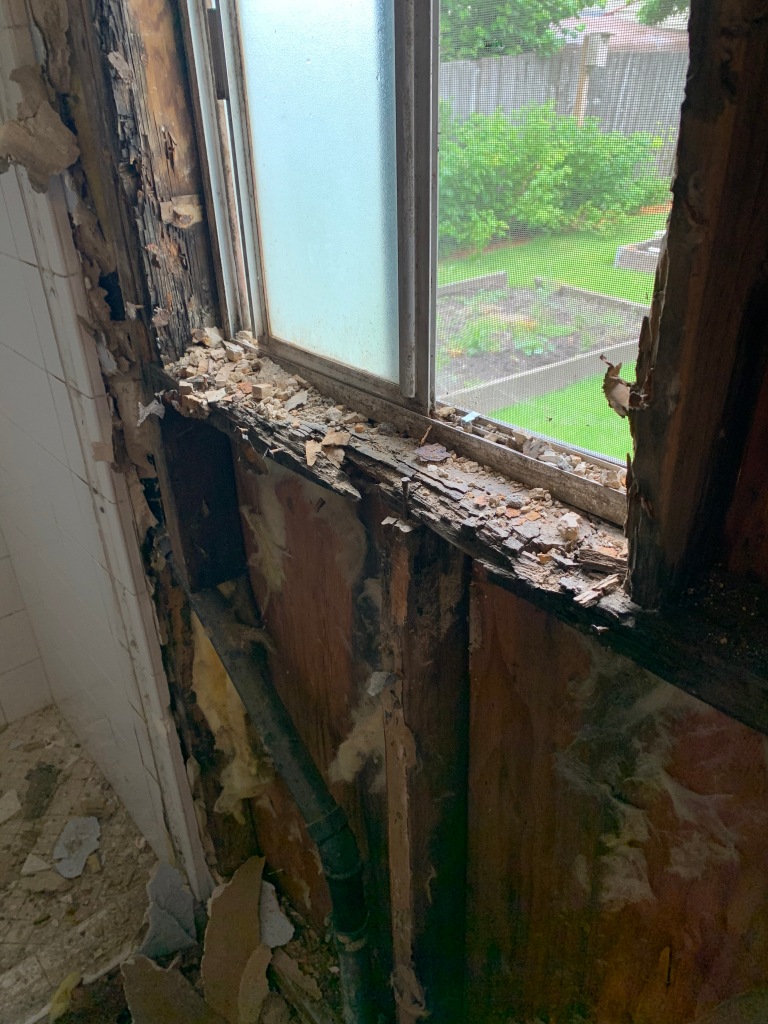
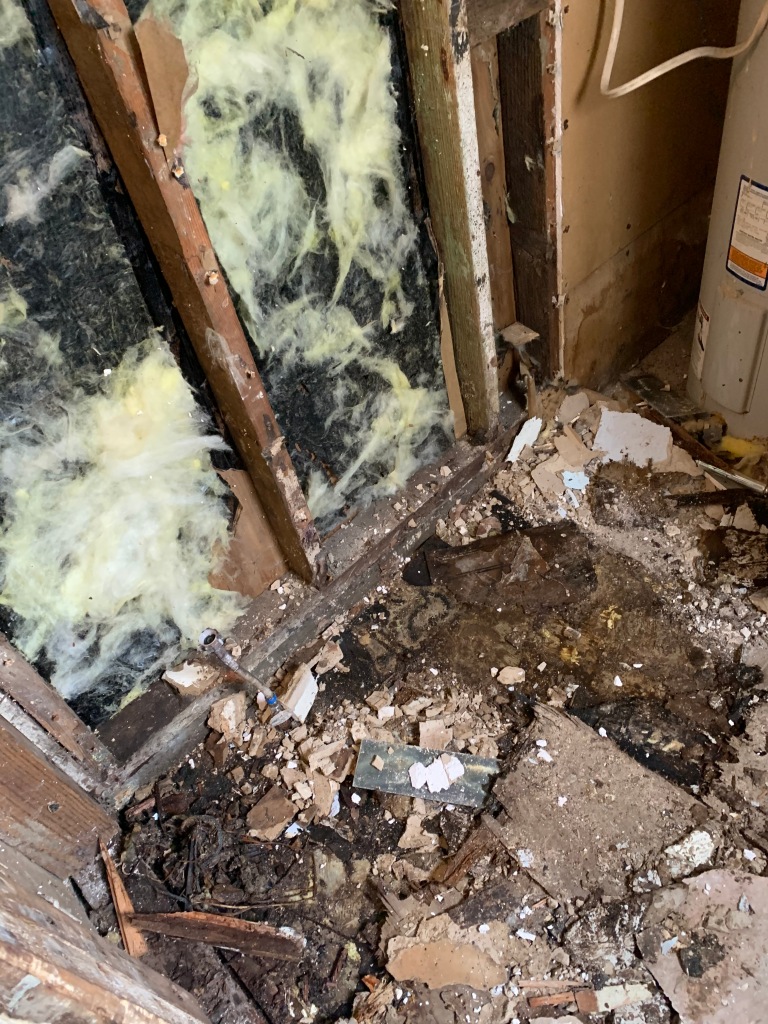
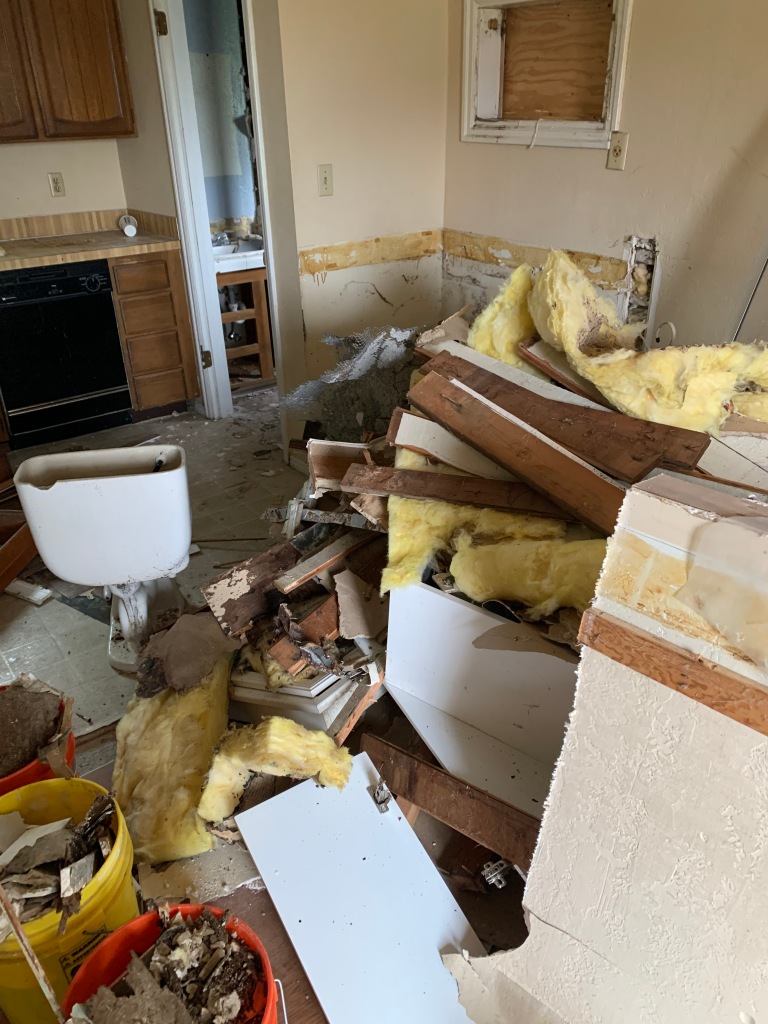
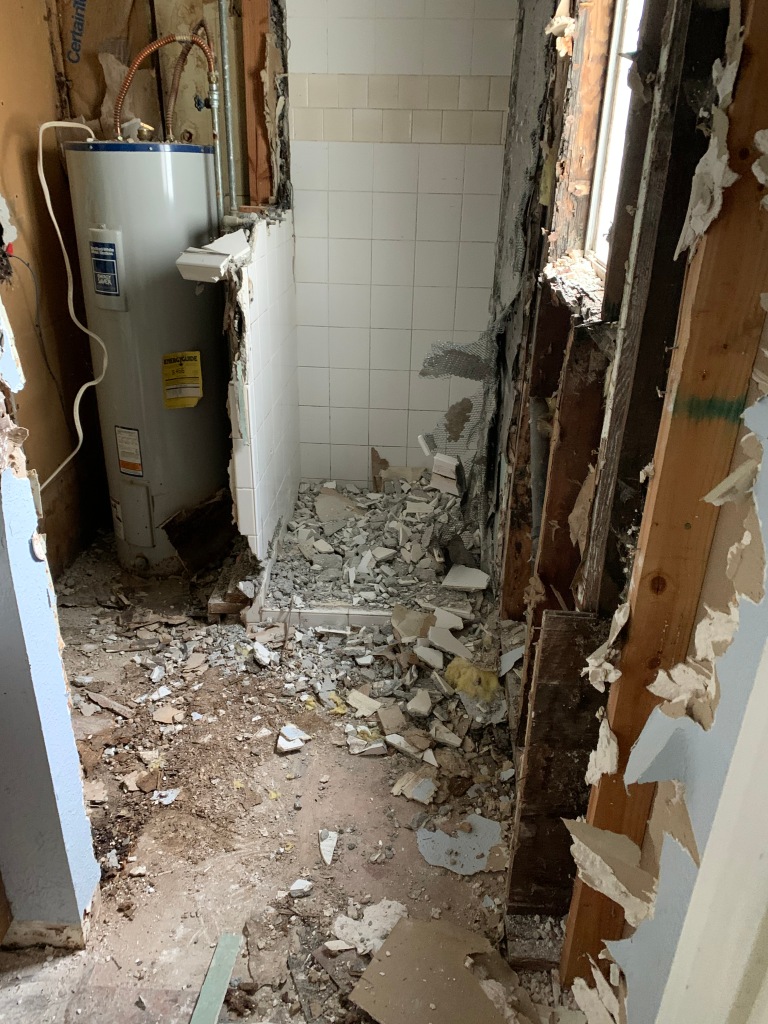
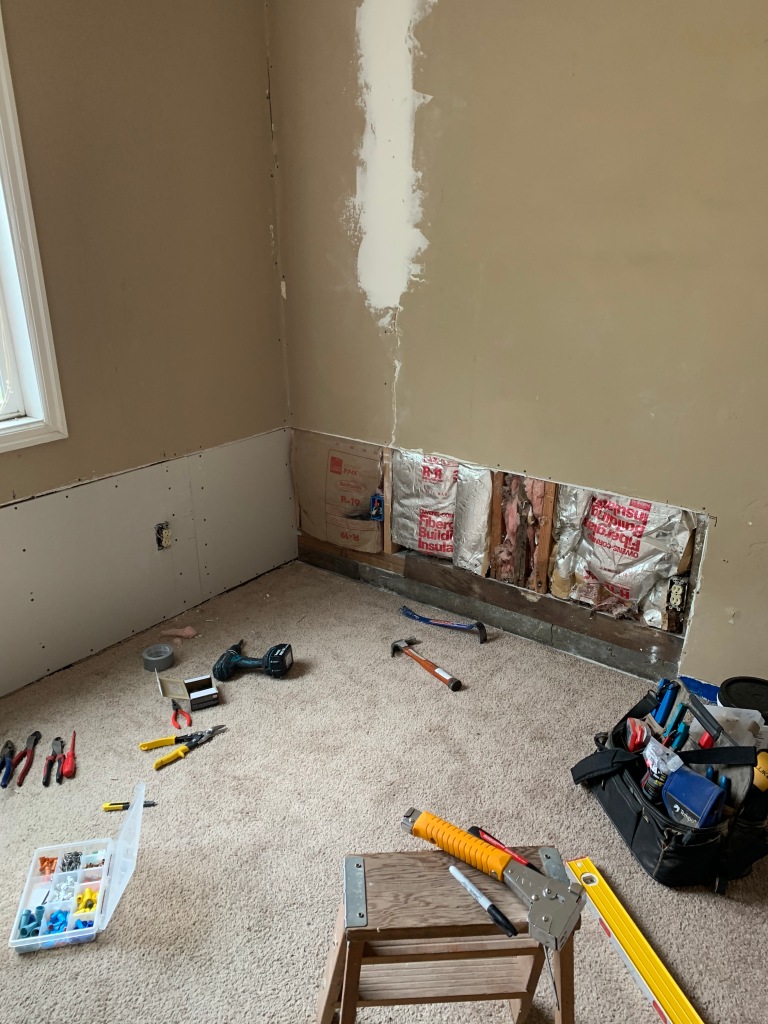
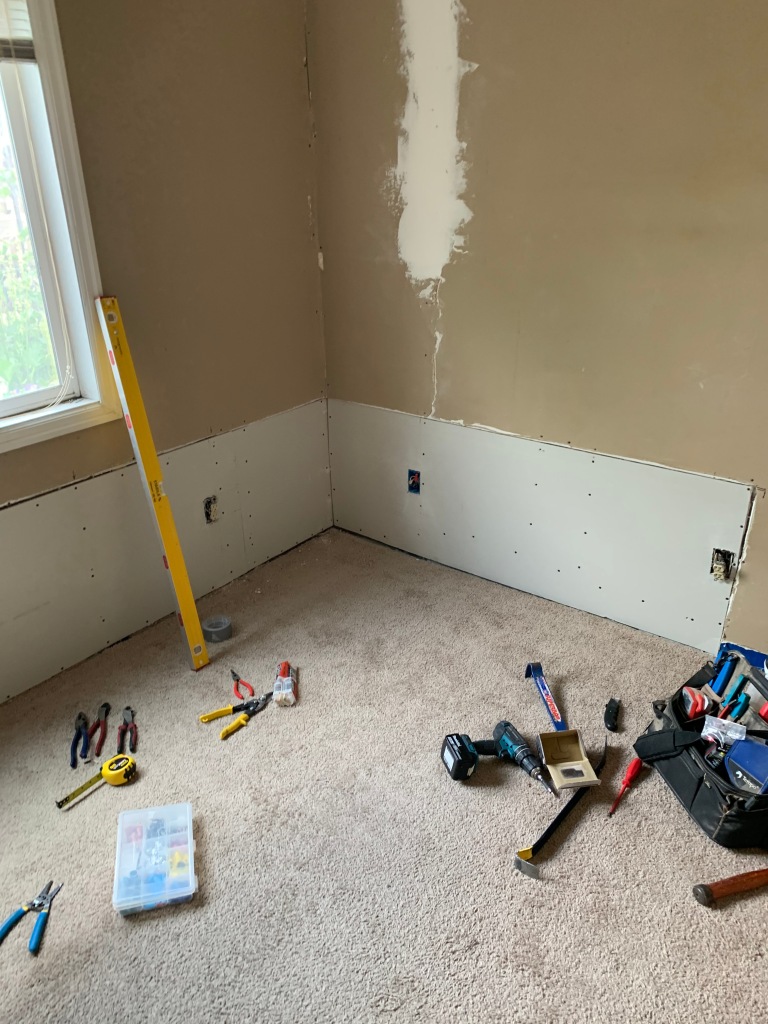
Yesterday’s progress on the bathroom. Boy is our work cut out for us.

May 19, 2020 – What the @#%! is a dipole?

This recent excursion into Audio/Visual equipment and electronics has gotten me looking around to the science of antennas. Boy let me tell you that from what is out there, this hobby is either a cult or dominated socially challenged individuals. It is very hard to get concise, novice level advice that isn’t filled with technical jargon.

The words cheap or DIY antenna conjure up some pretty ‘hacky’ results. Some of the first results found in such a search do bring up results, but they are very mixed up in technical details that don’t matter and use some techniques and materials that are lab worthy, but not something that will stand the test of time. I want to qualify before I get too deep that I am not an expert in the science nor do I have much (if any) experience in building antennas.

First, how do radio signals work? Each radio station has a frequency that they broadcast their signal. For example, 101.5 MHz is one particular radio station address. So what is a MHz?

  • M – Mega or 1,000,000
  • Hz – Hertz, unit of length of the radio signal in one second

That means that for 101.5, there are 101,500,000 waves in one second. All signals have an assigned band of frequencies that they can operate in. So, the smaller the number (of hertz), the the taller the wave is (because you are measuring the length in one second). Here are some examples from shortest to longest.

  • AM 535-1605 KHz (remember that kilo is 1,000)
  • FM 88-108 MHz
  • VHF 174-216 MHz
  • UHF 470-806 MHz

This is why antennas need to be specific size (length) to the signal that they are trying to capture. They are optimized for a frequency or band of frequencies, like a TV antenna. Also when looking at an outdoor TV antenna, notice that each conductor is a different length. This is to try and capture all of the frequencies that are available in the range.

So a dipole is a type of antenna that has a specific length of conductor that is optimized for one frequency. The most familiar dipole is the ‘rabbit ears’ type antenna. I wont go into all of the science on this version, however the principle is that you extend or adjust the length of the antenna and orientation to maximize reception of a particular frequency.

The length of a dipole is determined by matching the size of the radio wave to the frequency that you are trying to capture. Looking at the picture above, it would be an antenna that is one of the horizontal members sized for a specific frequency. There are calculators online that you can use to determine how long your antenna needs to be in order to capture the frequency you are looking for.

There is also a concept of directional or unidirectional. Directional means that your orientation of the antenna matters in the reception ability. Dipoles are directional, but it seems like the features where it matters, like Ham radio are not really affected for FM reception. We will find out.

The good news about all of this is that this is a novice look at all of this, so if you decide to build a dipole for FM, and your antenna is between 4’3″-5’3″ feet, you should be able to get most of the available stations. I will be posting about what I think makes a good antenna in the near future as I finish building it.

May 18, 2020 – It’s Alive!

I don’t have a ton of time lately. My schedule has been cruise the different job websites, apply for relevant jobs, write a blog post and then work on getting my rental house together. Even on the weekends, I have been doing this. I may get an hour or two some days and I have been spending it looking at my audio equipment.

The receiver is now working, which means the receiver and tape deck are now working. I also replaced the connection from the computer to the OEM speakers and run the sound through the receiver. I hooked up the surround sound and did a Dolby test, wow it has been years since that experience. I also have been playing my podcasts through the receiver as I putter around in the basement. That has lead me into investigations into building antennas and other things that I will talk about in a later post.

First, I thought that there was a component blown out in the receiver and that proved to not be true. Taking the cover off and looking around, I found a piece of dried grass that was laying across the speaker conductors (I couldn’t really get a good picture of it because it was too deep into the box). I used some compressed air to flush it out and viola, it works.

The same cannot be said with the CD player. That is currently in parts. I think I may have damaged it by not knowing what I was doing. A couple of things that I have learned so far… There is a downloadable service manual which has been helpful in not breaking things further. The CD player has diagnostics on-board which has told me that the table position sensor has failed (I think I damaged it when I tried to force the table back in). It is not easy to find parts outside of drive belt.

Looking around, there are some ‘local’ authorized service people. I may pursue that because it seems that this unit is still worth $200 according to Amazon. At the very least, I am going to look at the board and the sensor a little more carefully to see if a solder job is a quick remedy.

This journey has kind of fascinated me. There are people who are really into this sort of thing. I have to admit, seeing old units from the seventies next to an old magazine add is pretty cool. Learning the history and mystique that is attached to some of the old units is pretty interesting.

Lastly, unexpectedly and kind of serendipitously my wife received a record player for Mothers Day. It isn’t a real high end one, but I thought it would be fun anyway. I do still (think) that I have some records at my parents house, like “Thriller”. Unfortunately, the are travelling for a couple weeks, so I will have to wait until they get back to get them.

Last year, vinyl outsold CDs for the first time ever. It is definitely a growing trend. There is something in my head that seems wrong to play today’s music in vinyl. I am thinking of purchasing something like “The Very Best of Electric Light Orchestra: All Over the World”. That seems like an appropriate maiden voyage.

May 15, 2020 – Progress is faster than the documentation

A quick update for today (I know that I need to do more than take pictures). So much has changed in the last couple of days. The siding on the south and east side is done, the island is demo’d, the new heater is in and the drywall is installed.

With rain in the forecast this weekend, I will probably spend more time on the drywall finishing. We also got a new refrigerator today. It doesn’t fit into the space it is supposed to go. I will have to shorten the water supply which will require a bit of modification of the plumbing.

More pictures and info to come… have a good weekend.

May 13, 2020 – Rainy Day, time to work inside

Since my update last week, probably 75% of the siding is now up. There is still some caulking to be done as well as most of the painting. There is consistent rain in the forecast for the next two days so I am going to be switching gears on the outside and working on the inside.

In the interest of ‘edutainment’, I figure I should be working a little harder than just posting pictures of progress and a short blurb about it. I am going to try and get some helpful information in these posts. So, with that, here is a starter information about siding.

Now, wasn’t that fun?

May 8, 2020 – Ever driven with no headlights, in the dark?

Since the quarantine began we haven’t been out much. On occasion we have something that has to get done. In this case, we needed to get our exchange student to the airport at three AM. I was driving on the freeway and I thought to myself… “Wow, it seems the headlights are really dim. In fact, are they on?” So, I flipped the switch and the headlights came on again.

During that trip, it happened at least three different times. But, it wasn’t always both headlights. Sometimes it was one on either side of the vehicle. My first instinct was that it was an electrical problem. This Lincoln Navigator is a bit of a gremlin with electrical problems. There are what appears to be phantom errors with the parking sensors, check engine light, suspension monitor, etc. I check them with a code reader and reset and they seem to disappear.

Today’s headlight is a complicated and potentially expensive proposition. Not only are the bulbs expensive, but there are also ballasts and igniters, that is to say a bunch of electronics as part of the assembly. A big shout out to p38fln on f150online. The advice was that if both are going out within 2-5 minutes of startup, that it is likely the bulb. So, I ordered two new bulbs at $54/ea. The worst case scenario was that I replaced the bulbs for no reason, but they are ten years old at this point.

There are a number of good videos on YouTube on how to change the bulbs. It actually is pretty easy to access them. By far and away, the most difficult item is to remove and re-install the T-10 screws that hold the headlight in place. It is not a real accessible place and little screws tend to be difficult to start.

Start by removing the two 10mm bolts holding the assembly in. Once those are out, there is a tab on the left (or right depending on which light you are working on) that needs to be lifted. Pull the unit straight out.

With the assembly free, remove the three inserted light bulbs by twisting and pulling. Then remove the connection to the headlight by pressing the tab and pulling straight out. Now the assembly is out to remove the headlight.

Remove the rubber cover to the headlight. With at T-10 screwdriver, remove the two screw that hold the bulb. Pull the lamp out and disconnect the electrical connection. Finally, remove the metal clip at the base of the bulb and swap it onto the new bulb. Reverse the process to install.

I am happy to report that I have had no headlight outages since replacement. This is a limited data set and I have driven the vehicle three times since. But, it was happening every time the lights were on before I changed the bulb.

From this experience, I would recommend doing your research. I saw a lot of effort and cost expended by others when a bulb change was the solution. Replacing wear parts make sense when troubleshooting and repairing anyway. I dont know what a shop cost would have been, but I would guess several hundred dollars, plus the hassle.

May 5, 2020 – Project Update for the week

I may sneak one more in this week, just because rapid visual changes are about to happen. I have the lap siding to finish the south side. Nevertheless, I will talk about what has been accomplished since the last update.

It has been a structural journey over the last week. Sill replacement has been the focus. I replaced eight feet of sill from the south east corner of the window all the way past the front door. I started with completing the demo in the front. That took two days.

I continue to preach… the root of this problem is poor building practice. I believe that the reason I am dealing with this problem is that the driveway was laid right against the house. Wet cement touching non treated wood will lead to rot. The sill was cedar, which was good, but no match for bad decisions. Six inches of soil should have been removed before the driveway was laid so that it wouldn’t be against the structure.

I removed and reset the door. The rough opening barely allowed the door to fit (they were exact measurements – opening and door). Fortunately, the framing around the door was rotting anyway, so I restructured the framing to allow for 1/4″ clearance around the door.

Because of the thickness of the sheathing and siding, the door did not fit properly into the opening with the trim. That was all rectified so that there will be a unified trim look and hopefully a better fit inside.

The door also needed new structure under the threshold. The last opening was actually hacked out of the sill. Not only was the sill rotten, but the height and angle left the threshold sagging and a gap under the door.

This whole process was a slow go with jacking and temporary supports. I needed surgical cuts with butchery grade tools and cancer of unknown spread. I think we are through the worst of it and look forward to putting it all back together.

Also exciting news, we have agreed on a price and scope of work to reconfigure the bathroom, the entry door will no longer be in the kitchen, stubs of pipes will no longer be out of the floor and there will be space to add a washer and dryer.

April 22, 2020 – Just because it is raining, doesn’t mean the work stops

Looking at the forecast for the rest of the week here, there is definitely rain all day today and it looks iffy until next Tuesday. There are supposed to be dry days but gray with mixed showers until next week. That is a real bummer when you are trying to button up the exterior of house.

So, I thought I would show some progress and then talk about how I am going to work around it.

First of all, I guess that I have been pretty lucky in the weather lottery. Many times in April, it can be just as wet and cold as December, just not as much light. So, the fact that I have had three weeks without a lot of rain is pretty remarkable.

The house wrap is on the back and side (as shown). I have barely touched the front as I can see there is rotten sill. That will have to be repaired before we can button it up completely. My current strategy is to work on those two sides until I run out of materials. I am guessing that will be at the end of this week.

I did drag some of the T-111 and trim boards into the basement for painting last night in preparation. Today, I am going to try and make some progress on pre-painting before installation. It is much easier to paint materials on the ground and touch up nail holes and such when installed than trying to paint everything in place.

Aside from that, I did some drywall damage cutting the rotten studs out and replacing so I can switch to inside. The window trim will have to be modified now that there is a new window. I am vacillating around replacing or cleaning the drywall in places. The main reason is that I think the carpet is in reasonable shape and I am worried that it will be ruined if I start cutting chunks of drywall out and mudding it up.

Lastly, there is always clean-up. At least the way I work, things come out of the shop and get thrown back on the bench when returned. Saw dust piles up and it is kind-of a mess to work in and around. I have been doing it on the weekends as preparation for the next week, so it is not horrible but it bugs me to see things in disarray.

April 21, 2020 – Truth in advertising, the $100 pantry?

Before I started on the pantry project, I had estimated for my wife, the cost would be $100. My estimation was based on my belief that I would need finish, hardware like drawer slides and some incidentals.

I was cleaning up the other day and I ran across the pile of receipts from the project. So, I was curious myself how I did. I knew that it was more than $100 based on some repair to the bandsaw, but how bad was it?

DateLocationReq. CostOpt. CostDescription
Jan 17True Value$19.85Dust collection, glue
Jan 20Home Depot$40.83Hardware, plywood
$55.12Polyurethane, dust collection
Jan 25Bi-mart$16.97abrasives
Feb 4Bi-Mart$8.49hardware
Feb 11Lowes$12.87knob, bandsaw blade
$17.17Extra blades
Feb 11Amazon$158.94Bandsaw blade release
Feb 11Do-It Best$4.99Electrical extension
Feb 14Woodcraft$45.97saw maintenance upgrades
Feb 14McGuire Bearing$10.56Thrust bearing
Feb 21Bi-mart$4.49Epoxy
Feb 25Bi-mart$4.99patching compound
Feb 26Home Depot$1.48shims
Feb 26Sherwin-Williams$22.07Paint
Mar 3Lowes$6.18Brads
Totals$275.89$155.08$430.97

So, the truth is that I didn’t make it under $100. Without the saw problems, I would have been much closer, more like $120. In addition to the required cost, some of the optional costs could have been avoided, like the polyurethane turned out to be an unnecessary purchase. I upgraded some parts in the bandsaw when I was dealing with the bearings.

I certainly never planned on dealing with a tool failure, but it happens. The other optional purchases were for productivity or replacing used stock items like abrasives. Productivity is hard to quantify but stock is not; I did not need to buy those items because I already had them. Technically, not part of the cost of the project, but realized as part of it.

So, it is a $450 pantry.