Category: Projects

November 16, 2020 – Testing some changes and building a template

Supposedly, things are working the way they should. I did finish my post on Friday, not without struggles. Things were adjusted again and I will see if they working better. In technical jargon, there was some caching issues and a bunch of sessions on the server, more than were allowed. I have a hard time buying that, but I guess time will tell.

As another side note, I have discovered that it seems like my maximum image size is 2500×2500 pixels without upgrading server resources (paying more). It seems like I am going to have to edit every image in order to get them to post. I guess where I find this frustrating is that this is not the cheapest plan, I don’t know how the cheaper plans would work beside just plain text or a simple static site.

OK, accountability time. I didn’t finish the mantel on November 4 because I didn’t stick to my schedule. And I didn’t stick to my schedule because I wasn’t feeling like it. Part of my excuses were fiddling around with this site more that I should have. Part of it were other things in life going on and a lot of it was I was just not being disciplined.

That doesn’t mean that I haven’t made progress or that I am not close, because I am. I have the final fitting and the finishing to complete. I think that I should be close by the end of the week. But, what I wanted to talk about today is making a template for the proper fit.

The mantel is not even depth across the width. It is an inch wider on the right side than on the left. I was also concerned about different angles so I built a template of what the top should be so that I could try to get this as close to perfect on the first try. This is a technique that is used by counter makers to try and accommodate for uneven walls.

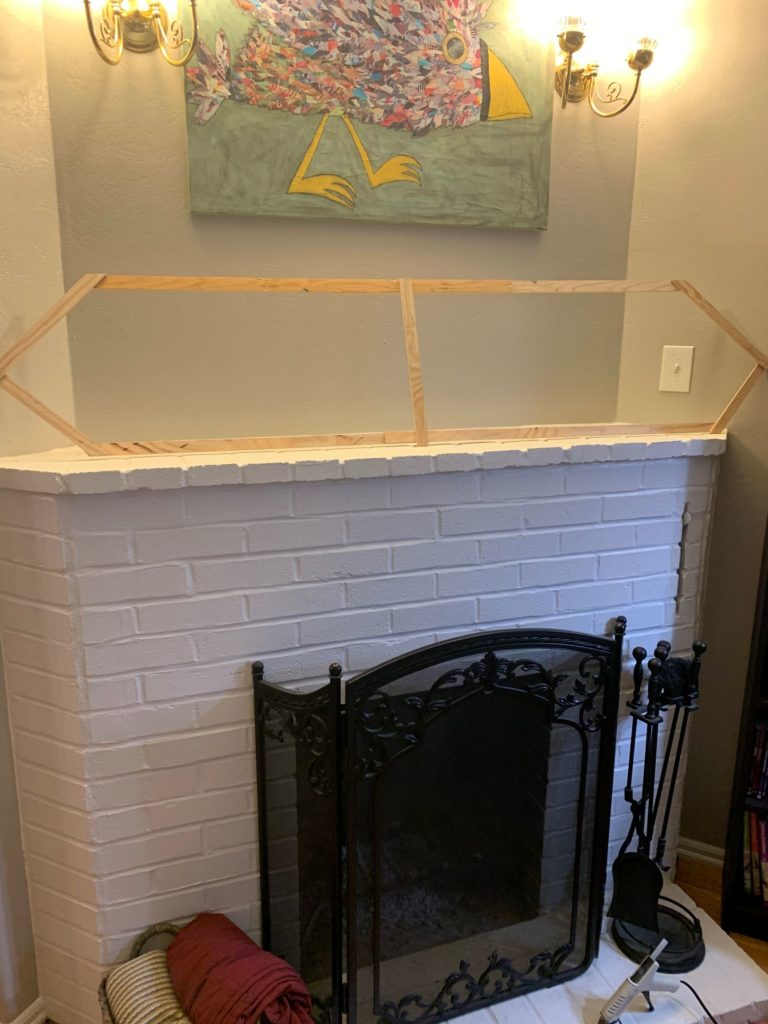
To build a template, one way to do it is use thin pieces of wood, hot glued together to follow all of the contours and angles. This also helps as a mock-up technique as well to make sure that you have an idea of the proportions of what you are building. This template is then used to trace on your work so that with an accurate cut, you get a perfect fit.

To get the very best fit, the template should be scribed against the wall. Scribing involves using a compass following the wall at a set distance. Once the line is made to fit all of the contours, cut to the line and test the fit, it should fit like a glove. I realize that this is vague and probably warrants a video or separate post. Check this tutorial for a primer.

Templates can also be made with paper or cardboard as well. Use what you have on hand and what is convenient to work with. Take your time and sometimes a template is the right technique to use.

November 7, 2020 – Sunday Bonus: What does a chemical engineer do?

It’s career day at Alt-F4. Well, not really especially since I have never had the title of chemical engineer. However, I have done the job. A chemical engineer does a lot of scaling, unit conversions and process type work. I spent over four years doing very similar work early in my career.

So, why the heck do you really care what a chemical engineer does? Well, from a practicality standpoint sometimes you have to do some unusual stuff. In my case, I am still struggling with the leaf blower, I bought some 40:1 fuel thinking that was probably the ticket. I incidentally ran across the manual this week and discovered that it is supposed to actually take 16:1 fuel mix.

First, good luck finding a 16:1 pre-mix in the store. I don’t think any of the modern engines run that kind of ratio. If you are going to make it yourself, that is 8oz of 30 weight oil to 1 gallon of fuel. I don’t really want to make a gallon especially now that I have almost a full gallon of 40:1 that is not really useable in any of my other machines. Another added bonus is that I could make 40:1 into 50:1 in the same way to use in my trimmer or chainsaw. This avoids having a bunch of cans of different mixes lying around because I don’t use that much anyway.

Another thing that I don’t want to do is leave a bunch of fuel in the the tank. I don’t know when or if I will use it all. So, my plan is to make up 1 cup at a time of 16:1 out of the 40:1 that I already have. I have to do some relatively simple calculations so I can use the equipment that I have to do what I want.

  1. Work in units that are ten based (i.e. metric) for easier calculations

According to the manual, the tank is 16.5 oz. The conversion is 29.57 ml/ounce.

16.5 oz * 29.57 ml/oz = 487.9 ml of fuel in the tank, round up to 488 ml

2. Figure the oil component of the mixtures

If the tank was full of 16:1 mix then I will calculate how much oil that is by dividing the total volume by the ratio.

488 ml / 16 = 30.5 ml oil in a full tank

488 ml/ 40 = 12.2 ml oil in the tank in a 40:1 mix

Now, subtract the difference between what you need and what you have and that will tell us how much straight oil I would need to add per tank.

30.5 ml needed – 12.2 ml have = 18.3 ml oil to add per tank

3. There are simpler ways to do this, but I will do it again for emphasis to make up my mix per cup.

1 cup = 8 oz

8 oz * 29.57 ml/oz = 236.56 ml in a cup

236.56 ml / 16 = 14.79 ml oil at 16:1

236.56 ml / 40 = 5.91 ml oil at 40:1

14.79 ml – 5.91 ml = 8.88 ml oil needed per cup

4. Convert ml back to imperial measurement (teaspoons)

1 teaspoon = 4.93 ml

8.88 ml oil needed / 4.93 ml/tsp = 1.8 teaspoons oil per cup to make 40:1 into 16:1

I hope that I made my point that sometimes this kind of math can be useable. My points for doing this this way is to protect the machine from excess fuel in the tank and using what I already have have.

October 26, 2020 – A little more about project planning, with an actual plan

Sometimes when I write, I don’t have a solid end goal in mind. I am writing against the clock to get my content generated so that I can move on to the next thing. I really wanted to get an example plan made up so that I could show it in action, but I didn’t want to spend the time I needed to make the plan, craft a well written article and also get some other work done.

Maybe it would be better to hold off and write something more comprehensive. But, the way I am working now, I am looking for not letting perfect be the enemy of the good. So, today I have created the plan for my mantel project and I can talk about how I use it.

On Friday, I introduced the concept of work segments (or units as I have written above). Remember that those are the blocks of time that you have to complete a particular task, or tasks that have a natural ending. So, I have broken my tasks down to what I think I can accomplish on a given date (assuming no interruptions) with no more than four hours a day. If I treat each unit as a work day and my work days are Monday through Friday, then I would in theory be completed with this project on November 4.

I want to say a little more about planning. In my past, my experience and expectations as a project manager was to over plan (in my opinion). If you look at my plan carefully, you will see that there are still decisions to be made. That means that my end date could very well slip because I didn’t build any extra time for ordering bits, testing colors or making mistakes cutting parts. I am very close to margins on my whole lumber bill of material which means I may have to mill up more lumber to finish this project. The truth is, I should have done some of this planning before I started cutting and now I am hoping to make it work.

Wouldn’t then over planning play into my benefit? Well, maybe; the devil is in the details. In my opinion, the best plan is detailed enough to guide your work yet broad enough to have room for unanticipated elements or decisions that have yet to be made. I also feel like too much detail leads to rigidity causing too much time fiddling with the plan instead of working. I actually made this plan more detailed that I would normally to illustrate how the pieces should work together and the consequences of how one thing might effect the other.

If this project was a job, once my project roadmap is set, then I would just get started. I wouldn’t spend any more time adjusting mid-stream unless there is a change in scope for some reason like this changes from a mantel to a whole fireplace surround. Once the bid is confirmed, then there is nothing really to do except document the hours and cost against the plan. There is probably another article about dealing with change some time in the future. I don’t see it on this project, but if the opportunity arises, I will write about it then.

This plan is really for my me and my wife, this is her project and she is the customer. I do use this process but the main reason that I put it together is so that I have a way to communicate where I am at on the project, what is left to do, any expenses that may occur and when she can expect that I will be done. She does not get into the technical details of how things get done or what tool/technique should be used, but she does understand time. Each decision of the day potentially has a compromise on the schedule. It means that to get this finished, time has to be allocated in the shop in addition to my other business dealings and family life. I also have a much larger project, the farm table waiting for this to get done.

When it comes down to it, there is no real deadline for this project. But as I said on Friday, without deadlines things tend to slip and this might get put aside for months. If this were a job, I would want to add travel time to get materials, planning time, billing time and build more time into the schedule to account for unknown. That would then go into my estimate for my bid.

I am going to keep track of my hours for my own business purposes because I have largely done woodworking as a hobby, but I would like to have in my pocket the effort of a custom mantel. I would also mention that I have the material already so there is no cost there. All in all, this is probably a $2000 project for a paying customer.

October 23, 2020 – Planning for the end and success

If you are like me, then you then you tend to prioritize the things that you want to do over the things that you don’t want to do. Or maybe said a better way, I deprioritize the things that I don’t really want to do and find lots of reasons to not do them. This has lead to projects literally sitting around in the shop for years.

Sometimes, when these projects are personal you want to get away from rigidity, accountability and structure. It is OK not to proceed with a plan because that is part of the escapism or hobby aspect. Other times, even when the project is personal the shop space is used for business purposes and having partial built projects is going to be in the way.

Today, I am going to talk about building a project plan to get things accomplished in your life. These are the techniques that are working for me.

  • Visualize the End State

This probably seems self explanatory, however you need to know what the end state looks like. What is this job going to create, look like, function or how is this going to benefit me? It helps to have an end in mind when starting a project. Without a definable benefit, I would question that there is value to this project.

For wood working projects, I like to sketch out what I think the end state is going to look like. This helps me select the right lumber I am going to need and keep track of the sequencing as I work through the sub steps.

  • Be Realistic About Your Tools, Space, Skills and Available Time

For me, the biggest gotcha here was not looking at the overall time commitment and just starting on something without regard to how long a project was going to take or even whether this was a priority. I would suggest, look at your schedule and determine what available blocks of time do you have consistently. A 1000 hour project is a lot of nights and weekends.

The reason this step is important and in this order is that later, when you are determining your work segments, you are planning to make success within the time that is available. Let me try to be a little more clear. If you only have one hour a day available, your tasks need to broken down to the point that you can succeed within an hour every day.

  • Create Work Segments That Fit Your Available Time

If you only have one hour a day to work on a project, then your planning needs to be to that level. Since I am probably largely going to work on this project as part of working time, I won’t have that short of constraint. I will use it as an example.

  1. 4hrs – Rough Mill lumber 4x 6″x72″

or

  1. 1hr – Find the rough boards in the lumber pile that will yield 6″x72″
  2. 1hr – Rough cut four boards 6″x72″
  3. 1hr – Joint the four rough cut boards
  4. 1hr – Plane the four rough cut boards
  • Create Your Own Deadlines Using Your Work Segments

You can add up all the job parts and put them on a calendar. That will essentially give you a project time line for completion. Just remember that life is here, I don’t live on an island. I don’t have the luxury of every weeknight and all weekend all the time. I suspect that most people don’t either, so don’t build that in to your plan.

Do also build some extra time into each task if possible to correct mistakes. Unless you are an expert (in which case you probably don’t need this help) you are going to have some things to correct. This is time that can be used to jump ahead in the plan if everything goes well.

I know that once I get things planned, I now want to meet or exceed my own deadlines. That is OK. The point of this whole exercise is to get things done and feel good about it.

  • Socialize Your Plan for Personal Accountability

It is pretty easy to do all the previous steps and still not get things done. You have to be on edge a little bit about whether you are going to succeed to keep you engaged. A spouse pushing is a pretty big motivator, but a social media post or a friend could also work.

  • Keep Track of Your Progress for Future Use

Maybe you just guessed at how long something would take and you were badly wrong. You would want to account for that next time. There is also a piece where experience and familiarity can speed things up so it is helpful to keep track of progress for better future estimating.

There you go, you have just project managed your first project. That is all there is to it. I have used this technique to get un-stuck on projects very successfully. It is also a similar mindset to building estimates for my business.

October 21, 2020 – New project beginning

I have to say that I have been struggling a bit today. I know what I want to write about tomorrow, but today is a challenge. My mind is elsewhere, I don’t really want to be in front of the computer and I suspect that it has to do with some recent job rejections.

About a month ago now, my wife asked me to prioritize some build projects. One was a mantel over the fireplace and the other was a farm table. At that time, I had several concurrent jobs as well as a drywall repair job upstairs where the table is part of the whole scheme. That means now is the soonest I could get started.

I think that the mantel is going to be relatively simple. So that is the project that I should start on first. I am posting a picture of the table inspiration below.

Going out on a limb here, but with constant effort, I should be able to do this in less than a month, including two benches with the table and the mantel. Part of my previous issues included not spending dedicated time on the project. Well, that shouldn’t happen if I am spending my time building a business and partially working (plus my wife wants them).

Now you know the push of the next month’s worth of posts. Unless I score a big job, you can expect more problems and commentary about wood, maybe some tool reviews if I have to buy anything new for this project.

Alright. Now I have shaken the cobwebs out, it is time to wrap this up and get to work. I think that Friday will be how to build a successful project plan.

October 19, 2020 – Store what? Why?

If you are like most people, including myself then you have municipal supplied water at your house. And when that is the case, the quality and frankly safety of the water is completely dependent on another entity the water provider. Now, that is normally not a problem but consider when there is one, you are potentially days away from the beginning of the problem.

It potentially seems wrong but I have seen more problems with water than any other utility outage. Last year, there was about a four month boil order in place for the state capital residents. That is over several hundred thousand residents affected by water quality.

When that incident first occurred, there was a reverse 911 call put into effect. This was in the mid-afternoon and by the next day, water was sold out throughout the entire area. We were not effected because our town has a different source of water, nevertheless the water was gone in all the towns in our area.

This was the beginning of a chronic culture of panic behavior. It was the same with toilet paper or hand sanitizer. People are not prepared to deal with any sort of outage or service disruption. Inventory in stores are not deep enough to service the needs of the entire population.

This is why I store water. Just plain tap water put into seven gallon jugs. I dump the water about once a year to inspect the containers and just refresh the supply. This usually happens in conjunction with our annual hunting trip, because we use the jugs to bring water to camp for the trip.

A minimum recommendation is to store one gallon per person, per day. That is for drinking, cooking and sanitation. I’ve got enough water to last about a week at that rate.

When I was in college, we had a localized flood turned landslide that wiped out a bunch of infrastructure including water delivery. In that case, the water was out for around a week. National guard had setup portable toilets and water distribution within two days of the event and showers came about three days later. While I am not saying any event will follow the others, there are two examples of what can happen.

Water can be saved in any clean container. Opaque is better than clear because it restricts light causing growth of biological life. You can put up some amount of water almost free. Even if you are paying for it at a store, it should be less than $2/gallon. The mark of someone that is prepared is that they are taking advantage of this time of plenty to accommodate if there is scarcity.

October 14, 2020 – Fiberglass mesh or paper tape for drywall?

This is pretty esoteric, right? I mean it probably ranks right up there with plywood vs OSB or MDF vs solid wood trim in terms of excitement factor. Since I had some issues using both, I actually did some research about the subject myself.

This is the advantage of a scattered and lack of focus blog is that I can just write about whatever I am doing at the time and try to make it seem interesting and that I am an expert. Well folks, if you are reading this either I am an expert (to you) or you are desperate for this very important decision, so let’s get into it.

Drywall became a product in the 1950’s to replace plaster. It came into common use in the 1960’s and there is no looking back. It seems like some specific areas of the country still use plaster (over a backer board like drywall) but it is drywall for most of us.

The primary advantages of drywall are that it is inexpensive, quick to hang and is fireproof. The paper backing will burn but not gypsum (the white stuff). The disadvantages are that it is not waterproof at all and will support hazardous mold and mildew growth with continuous wetness. Also, doing a nice job of finishing requires some skill.

In my area of the country, drywall is finished with a texture to hide the lack plastering skills (or making smooth walls). Other areas of the country, it is more prevalent to see smooth finishing. What we are most concerned about in this post is the seems where two pieces of drywall meet. Tape is put over the seems to cover any gap if the drywall panels expand and contract with temperature and relative humidity.

Conventional wisdom says paper tape is the first, best solution. It is cheaper than the fiberglass tape and seams to be easier to work with. You start by putting a mud bed, the width of one putty knife, I like the four inch knife. It is said that as that panels move behind the tape and you get a more consistent smooth finish.

In the picture above, the paper tape was incorrectly applied without the mud bed behind the paper tape. This has led to the tape pealing off over the years without adhering to the drywall. I have made the repair by adding new tape and top coat. I will use a wider knife (6″) for the next layer on top. The third pass if there is one will be an 8″ knife. You keep building successively wider knives and passes until the the tape disappears.

In this picture you see another manifestation to the same fault. A crack has developed where the paper tape edge transitions. Again, the mud bed was not set behind the tape creating a gap.

Fiberglass tape’s best use is covering gaps. This material is much more rigid and all the grooves allow you to press mud into the tape. I have found that it takes thicker passes to cover the fiberglass adequately, but it does do the job of covering smallish gaps, like less than 3/4 of an inch.

In my bathroom that I just completed, the contractor used fiberglass tape exclusively and it came out great. So, it is not that it can’t be done but I think it takes more experience to do a nice job.

The secrets that I have learned are as follows.

  1. Do not overwork knife when applying joint compound. Less is more because you can always add more later.
  2. When using wide knives, work the joint compound out of a tray rather than the container you purchased. You need to be able to continuously scrape your knife edge clean and get an even layer of compound on the knife. That can only be done when you container is big enough to hold the knife.
  3. Big, blobby mistakes can be sanded down but it is a dusty mess and surprisingly a lot of work. Use a sanding screen rather than sand paper to do this job. Screen is found around the sandpaper in stores and doesn’t clog nearly as quickly.
  4. For texturing, I layer a bed of joint compound and then dab at it with wadded up plastic bag. I then knock down all of the dimples with a clean trowel or knife to get the effect.
  5. Don’t feel bad if you are intimidated or don’t get it right. This takes practice to do a nice job. I have only recently gotten the confidence to do whatever, whenever. I used to do everything possible not to disturb the drywall for fear of finishing failure. Now, I find it easier to cut out a whole wall if it will make it quicker to do a job.

So, you see the answer depends on the situation. Both can work and both have advantages with different variables.

October 12, 2020 – Playing roulette today

I have been working on a video on the repair of an old leaf blower since the fifth of July. The reason I know that date is that I wanted to use the blower to help clean-up the mess that our fireworks made and I couldn’t get it started.

Now, this doesn’t surprise me in the least. My dad gave me the leaf blower in 2007 or so, someone had given it to him. When he did, the tank was half full of two stroke mix. I ran it a couple times but then it sat in the shed until about two or three years ago when I tried to sell it at a garage sale.

At that time, I again started it to verify that it would run but it didn’t sell. I thought that it was too valuable to just throw away, so I put it back into the shed. Finally, when I wanted to use it this summer I couldn’t get it started. I thought that this would make a good project to film in short, helpful video.

As many things, it turned out to be more challenging to fix then I anticipated. While, I solved the initial problem on the sixth of July, my lack of knowledge and my time restrictions put it aside until late August. When I tried again, I did actually get the leaf blower running, but still not reliably or well. So, I tried again in October now wanting to actually use it in the yard and I think that I got it working.

Why is the post about roulette? After editing my video clips together, I have been waiting several hours for it to convert (or export as it is termed). I was waiting to write until I could actually embed the video into the post, but I am running out of time.

In fact, I am not sure why this isn’t working. I have used this software for most of my video editing. I know that I have not done much of it, but each time I use it seems to get clunkier and less reliable. I don’t know what is going on. It is part of the Pictures app on the Microsoft 10 operating system. I probably need to investigate another editing software if I am going to do much more of this type of work because this one is really painful.

It’s funny because the first video I ever created has become wildly more popular than I ever expected. In fact, I never expected anyone to care I even misspoke about the tool’s model number. It was right in the tagging, but I never thought anyone would ever watch it so I really didn’t put much effort into it.

Looks like my number finally came up… It only required some .NET updates and an application reset and multiple restarts.

August 26, 2020 – Just a car…

Tomorrow I say goodbye to the Mustang. It was tentatively sold within one hour of being put on Craigslist. I had heard that this was a buyer’s market but man, I was not prepared for this.

We stand to make significantly more than we currently owe, and with it we will pay off our other car loan as well as pocket some money. You could say that God provides because we are in a position where we need to get some financial momentum. This will make our obligations $1200/mo less than last month. We will also be able to reduce our insurance bill as well, not sure what the total benefit will be.

Despite the very positive, I am sad. I wanted to drive that car more. I wanted to be involved in a car club, go on rally runs and drive it on the track. I wanted to make cool modifications and show the car off. Lots of places I went, I got compliments on the car. You could often start up conversations with people about the cars they used to own.

Did you know that Mustang drivers have a secret club? They often wave at drivers of other Mustangs. There have been countless times I have gotten a friendly wave from people just to say that “I see your car”. There have also been times when people want to race you off the line or down the freeway. I never did, but its the little things that I will miss.

Here are some final pictures to remember the car.

It is after all just a car. I enjoyed it as much as I could. When I worked, Friday would be the day I would put it into sport mode and use the paddle shifters. I loved getting it up to 6000 RPM before shifting into the next gear and hearing the engine roar.

It was a bit indulgent to purchase this car in the first place. I got kind of caught up in the want over the need. I was looking at used Porsches and this was a more affordable entry into sports cars and performance driving then the latter. We kind of purchased it on a whim, without too much thought. Now, it has turned into more of a financial liability as I work to repair the income side of our lives.

What I learned from this was that there is something as too much car. When you cannot actually use the power that the machine possesses, you have exceeded the necessity to have any more. My biggest regret was that I could never drive the car to it’s full potential. I never got to try launch control or put it into racing mode to really put the power to the test.

Some of the biggest things that I won’t miss are having a back seat too small for anyone but children. I won’t miss people making assumptions about your personality by the kind of car that you drive and leaving nasty notes on the windshield. I like to be able to see the parking lines when I am trying to park; this was a very difficult car to park, often I had to get out to see if I was in a good position.

I am now relegated back to my old F-150. It will continue to do journeyman’s work even though it has probably felt pretty lonely in the last four years. I did drive it a bit as I was working on the house all spring and summer, but it is in the need of some TLC. After seventeen years, things are finally starting to give up. I need a new battery, an emission line hose is leaking, the A/C is not working. So, those will need to get addressed shortly.

August 24, 2020 – Finally installed the dipole antenna

After the months of slogging through my remodeling project, I finally freed up enough time to finish this project and get it installed. The antenna has been built since May, but there was always too much to do to get it installed.

Some of my excuses were that I was too busy (which was true). I didn’t want to get on the roof when it was too hot, it seems like this summer has been warm late into the evening. The roof is very steep, so I needed to install roof jacks in order to safely get up to the top. In short, a five minute job took a couple hours to do safely and properly.

I can’t really say how well it works. There is quite a bit better reception just plugging the cable into the receiver. It is my perception that adding the antenna made the reception stronger, of the existing stations I got before the antenna. It seems to mitigate the night/day difference in reception (better at night than during the day).

Given how steep the roof is and that I already removed all of the safety staging, I am going to leave things as is without moving the antenna directionally to test reception. I know that this is kind of a ‘meh’ ending, but I really do think that this made a difference for me because the stations that I like seem to be stable. I guess we will see if seasonal differences mitigated as well.

I thought that I kept all of the receipts, but it seems to have gotten lost in the shuffle. I can give a rough breakdown or guess

  1. 1/2″ copper pipe, approximately 5′ – already had
  2. 2, 1/2″ pipe caps – $1 ea
  3. 1/2″ tee junction box – $3
  4. 1/2″ conduit – $4
  5. Antenna adapter -$5
  6. Simpson 90 – $6
  7. 2, 1/2″ conduit clamps – $2
  8. 2, 1″ conduit clamps, $2 ea
  9. PVC conduit glue – $5
  10. terminals, screws, clamps, cable, unions – already had

So, I have about $30 into the whole thing. Looking online, the cheapest antenna mounts I could find were $50. That didn’t include the antenna either.

I am interested in building an AM antenna in the future. In this case, I do have specific stations that I want to pick up. But, now that our local football season has been postponed, it is something I will do later as the urgency seems lessoned. I hope that you enjoyed this foray into the science and the mechanics of antennas as much as I did.